Calculations
Important
To use this functionality in a Business Central Production environment a subscription for the Custom Tiles & Calculated Values product is required.
You can test out this feature for free in a Business Central online Sandbox environment.
With the Custom Tiles & Calculated Values product it is possible to define custom fields that can perform a custom-defined calculation (e.g., a count, sum, average, etc.) and show the output of those calculations on your pages in Business Central.
Success
Custom calculated fields are always computed in the background. The values of custom calculated fields will only be available on the page after all calculations have finished.
Note that there is a time-out of 30 seconds, so even though the calculations are performed in the background, please make sure to optimize your calculated field definitions.
Calculated Field Setup
On the Custom Fields Definitions page you can set up calculations for a custom field by either invoking the Calculations action, or by drilling down on the Calculations field.
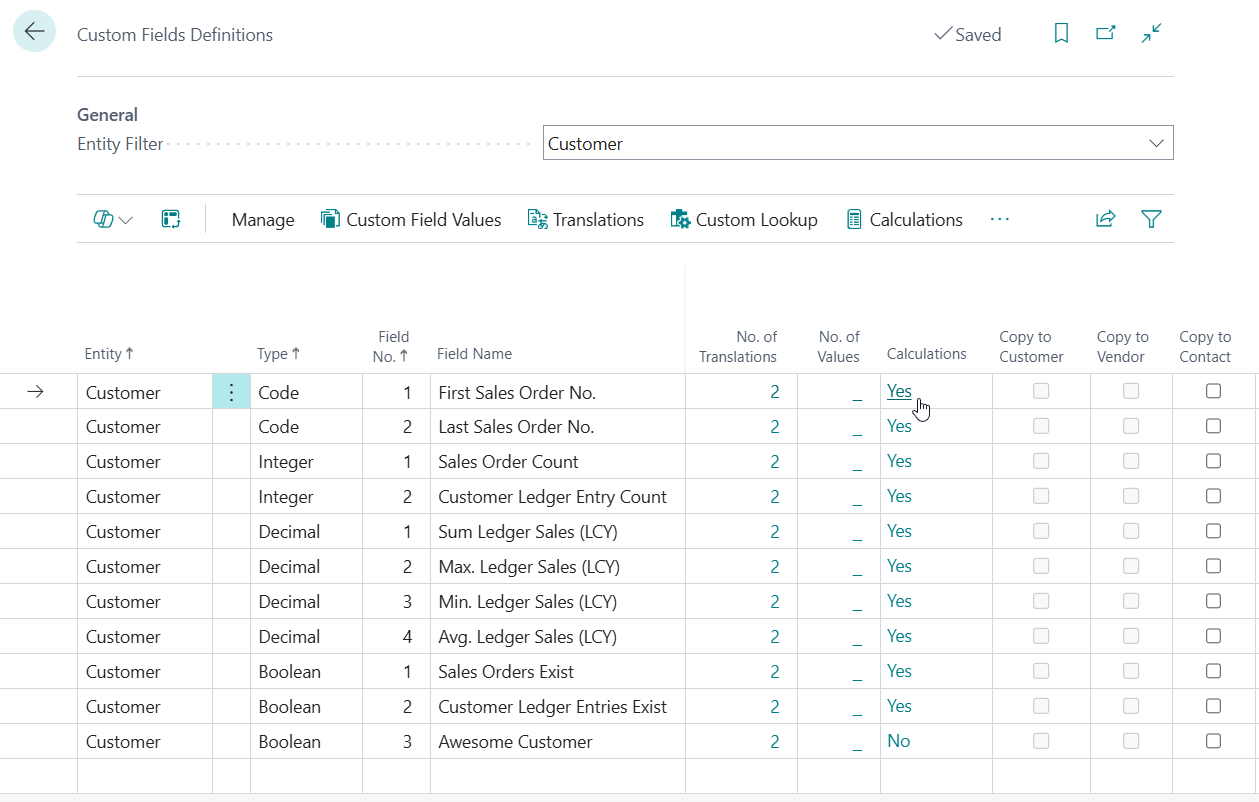
This opens the Table-Specific Field Setup where one can configure table-specific preferences for a custom field. The Customer entity only has a single table where custom fields are added (i.e., table "Customer"), whereas the Sales Header entity has multiple tables where custom fields are added (i.e., "Sales Header", "Sales Invoice Header", "Sales Shipment Header", "").
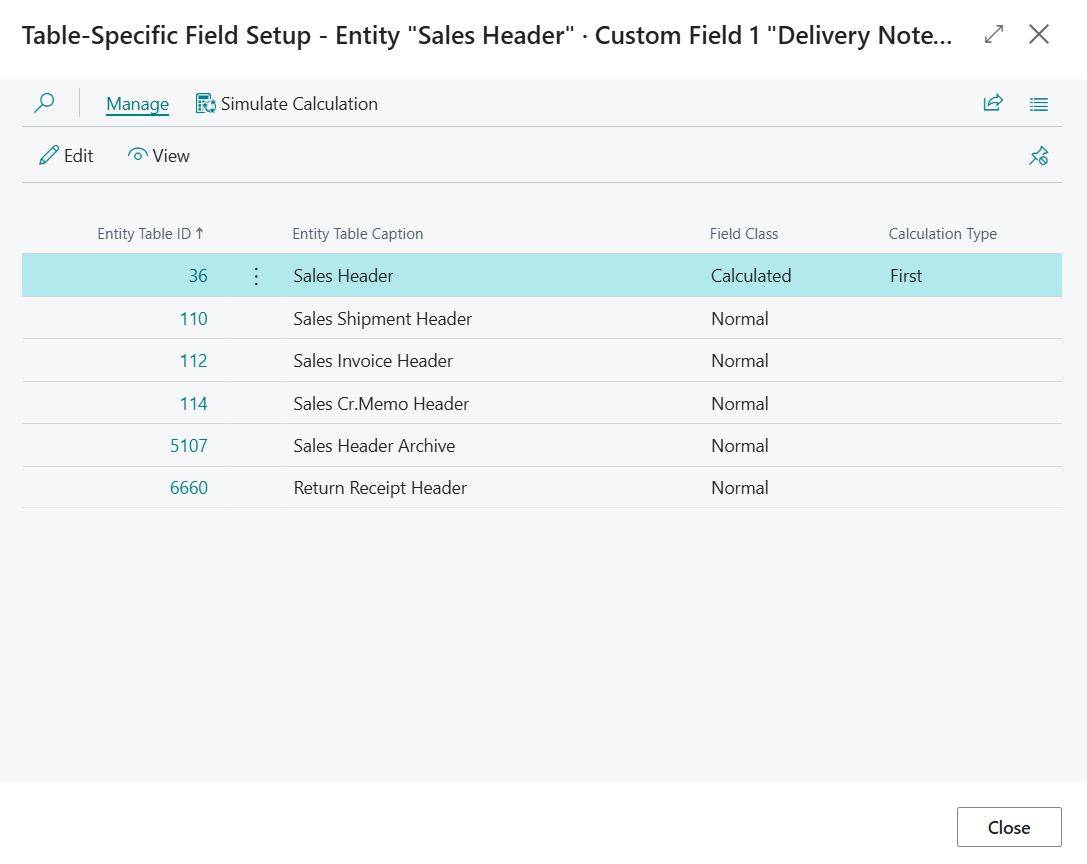
To change a custom field to a calculated field, one can change the Field Class from Normal to Calculated on the Table-Specific Field Setup page. When the Field Class has been changed one can configure the custom field as a calculated field to their preferences.
Calculation Type
The Calculation Type field is used to specify the type of calculation that should be performed.
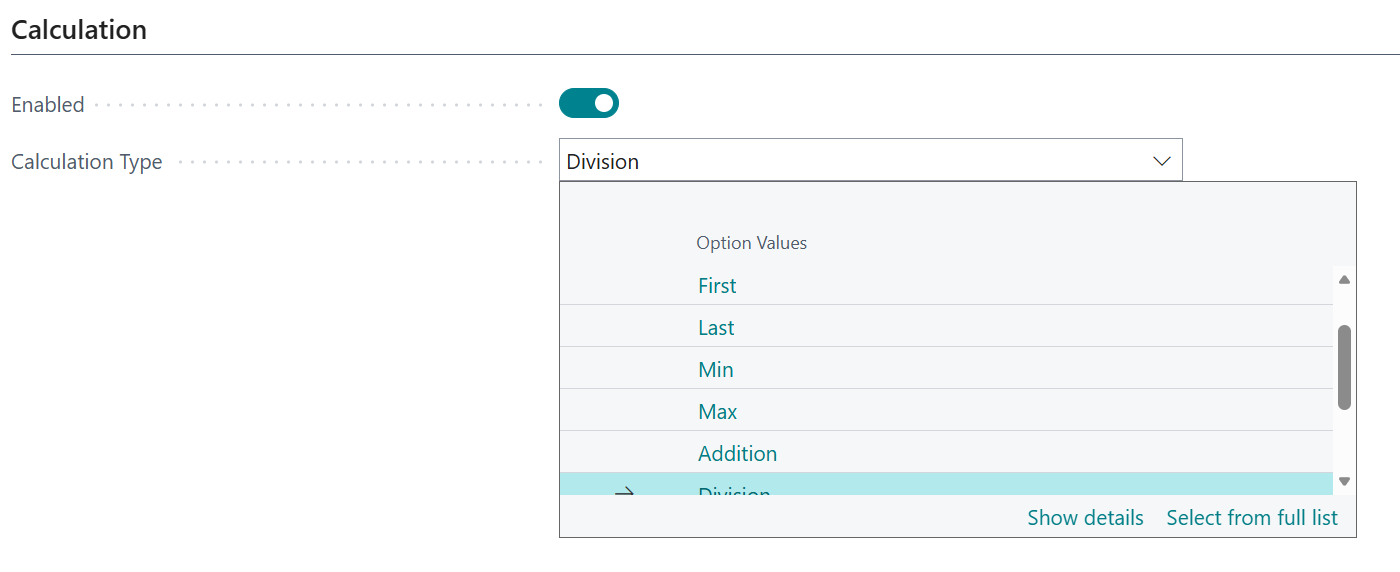
The currently supported options are as follows:
| Calculation Type | Description | Supported for Data Types | Supported Subcalculation Data Types |
|---|---|---|---|
| Sum | Calculate a sum over a certain field value. | Decimal, Integer | N.A. |
| Count | Calculate the number of records that meet the filters / link between entity and other table. | Integer | N.A. |
| Exists | Calculate whether there are any records that meet the filters / link between entity and other table. | Boolean | N.A. |
| Average | Calculate an average of a certain field value. | Decimal | N.A. |
| First | Retrieve the value of the first record that meets the filters / link between entity and other table. Can also be used for lookups. | All | N.A. |
| Last | Retrieve the value of the last record that meets the filters / link between entity and other table. | All | N.A. |
| Min | Calculate the minimum of a certain field value within the record filters. | All | N.A. |
| Max | Calculate the maximum of a certain field value within the record filters. | All | N.A. |
| Addition | Adds the numeric values resulting from 2 subcalculations. | Decimal, Integer | Decimal, Integer |
| Subtraction | Subtracts the numeric value resulting from one subcalculation from the numeric value resulting from another. | Decimal, Integer | Decimal, Integer |
| Division | Divides a numeric value from one subcalculation by a numeric value from another subcalculation. | Decimal | Decimal, Integer |
| Multiplication | Multiplies a numeric value from one subcalculation by a numeric value from another subcalculation. | Decimal, Integer | Decimal, Integer |
| Comparison | Compares two values (resulting from subcalculations) to one another to yield a boolean result value. | Boolean | All |
| Conditional | Calculates one of two subcalculations depending on a condition (whose value is calculated by a boolean subcalculation) | All | All |
For simple calculation types the calculation is configured by choosing a Table to aggregate records from, a Value Field to get the value from (if applicable for the calculation type), and setting up a link between the entity table record and filter table by configuring a (reusable) Filter Set.
Max and Min with Different Aggregation Field
For the Max and Min calculation types you can use an Aggregation Field different from the Value Field.
This allows one to achieve a definition like, for example, “The Description of the Item record with the largest Unit Price”. In this example, Description is the output value, while Unit Price is the field that is used to determine the record that has the maximum/minimum value.
'Unfiltered' setting
If you want to aggregate over all records in a table, then you can enable the Unfiltered setting. When the Unfiltered setting is enabled, you do not need to specify a Filter Set.
For composite calculation types the calculation is performed via so-called Subcalculations, which perform calculations that are combined to calculate the end-result (e.g., a division or multiplication).
Caution
Please make sure to take performance into consideration while configuring calculated custom fields. Even though calculated fields are computed in the background, poorly optimized field definitions could be detrimental for the user experience (e.g., users getting annoyed that custom fields take a long time to load).
Please note that you can use the Simulate Calculation(s) action (on the Custom Fields Definitions page and Field Setup page) to get an indication/estimate of the time needed to calculate the output of calculated custom fields. This can be a helpful tool to help prevent and/or assess potential performance degredations from calculated custom fields.
Filter Set
In the filter sets you create a filter on which the value of your custom field/tile is being determined. The value in the Code field is being determined automatically but you can edit it if you want to. Give your filter set a recognizable Description.
In the Key ID field choose the most appropriate key/index (i.e., typically including the fields on which you intend to filter) The Key Name field shows the corresponding name of the key, displaying the key fields. The Key Order defines if the sorting is ascending or descending.
On the Filters tab you can set up your filters based on the fields in the filter table. You can filter a field on a field from the entity table (Entity Table Field), a Constant Value, or using a Filter String.
You can use multiple filter options in the Filter String field:
| Data Type | Filter Token | Description |
|---|---|---|
| Date | TODAY or today or T or t |
Returns the date of today as a date value |
| Date | YEAR or year or Y or y |
Returns a filter for the current year value |
| Date | WORKDATE or workdate or W or w |
Returns the workdate as a date value |
| Date | YESTERDAY or yesterday |
Returns the date of yesterday as a date value |
| Date | TOMORROW or tomorrow |
Returns the date of tomorrow as a date value |
| Date | WEEK or week |
Returns the first and last day of the current week as a date filter value (eg. 6-10-2025..12-10-2025) |
| Date | MONTH or month |
Returns the current month as a date value (eg. 1-1-2025..31-1-2025) |
| Date | QUARTER or quarter |
Returns the current quarter as a date filter value (eg. 1-1-2025..31-3-2025) |
| Date | CW or cw |
Returns the last day of the current week as a date value |
| Date | CM or cm |
Returns the last day of the current month as a date value |
| Date | CY or cy |
Returns the last day of the current year as a date value |
| DateTime | NOW |
Returns a range of the start of today until the end of today |
| Integer | LANGUAGEID |
Returns the language ID of the user who runs the page as a value |
| Integer | LOCALEID |
Returns the locale/region ID of the user who runs the page as a value |
| Integer | PROFILEID |
Returns the profile ID of the user who runs the page as a value |
| Guid | NULLGUID |
Returns the null-GUID |
| Guid | USERSECURITYID |
Returns the security ID of the user who runs the page as a value |
| Text | LANGUAGECODE |
Returns the language code of the user who runs the page as a value |
| Text | ME or me |
Returns the user who runs the page as a value |
| Text | USER or user |
Returns the user who runs the page as a value |
| Text | COMPANY or company |
Returns the value of the Company Name from the Companies table as a value |
| Text | %mycustomers |
Customers in the My Customers list on your Role Center |
| Text | %myvendors |
Vendors in the My Vendors list on your Role Center |
| Text | %myitems |
Items in the My Items list on your Role Center |
For fields of the type Date/Time filtering in standard Business Central can be difficult. To make use of this field in calculation filters we've added a few new filter tokens:
| Filter Token | Description |
|---|---|
TIME_STARTOFDAY |
Returns 00:00:00 as time to use (N.B. this is safer to use then typing in 00:00:00 manually, as it will also work in an environment where users are working with different regions) |
TIME_ENDOFDAY |
Returns 23:59:59 as time to use (N.B. this is safer to use then typing in 23:59:59 manually, as it will also work in an environment where users are working with different regions) |
DATE_XDAYSAGO |
Returns the date of X days ago as date to filter on (based on the work date). You need to replace the X by a number |
DATE_STARTOFWEEK |
Returns the date of the start of the current week (based on the work date) |
DATE_STARTOFMONTH |
Returns the date of the start of the current month (based on the work date) |
DATE_STARTOFQUARTER |
Returns the date of the start of the current quarter (based on the work date) |
DATE_STARTOFYEAR |
Returns the date of the start of the current year (based on the work date) |
If you set a filter string on a Date/Time field, then you can use the following syntax:
<DateToken1> <TimeToken1> .. <DateToken2> <TimeToken2>
For example:
DATE_STARTOFYEAR TIME_STARTOFDAY..WORKDATE NOW
which means ‘All records from the start of this year (based on the workdate) till the current workdate datetime’
Additionally, the app supports most of the default Business Central filter options as described in the standard documentation (see the Sort, search and filter and Working with calendar dates and times documentation on Microsoft Learn for some examples)
Enum/Option fields are based on enum filtering, when you fill in for example Order in the Document Type field in table Sales Line the system automatically recognizes that this is option 1 which is the ordinal/numeric value for Order.
Important
Filtering options make it possible to create a dynamic date filter
For example if you want to see the due quotes from the current week you can use the following filter: cw-1w+1d..cw.
When the current date is October 10, 2025 the filter returns the following date value: 6-10-2025..12-10-2025.
Important
Date filters must always be in English as mentioned above. This prevents issues when users work in another language.
Display Type
The custom calculated fields can also be shown in the Custom Tiles factbox on the card and list pages. You can change the appearance of a calculated field by changing the Display Type setting in the calculated field setup.
The following Display Type options are available for displaying custom calculated fields:
| Display Type | Description |
|---|---|
| Page Field | The custom field is shown on the card page as a field. |
| FactBox Field | The custom field is shown in the Custom Tiles factbox as a factbox field.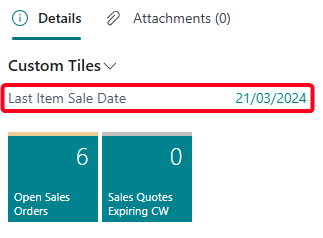 |
| Tile | The custom field is shown in the Custom Tiles factbox as a tile/cue. Only supported for Decimal and Integer fields. 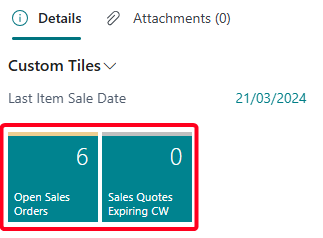 |
| Page Field and Tile | The custom field is shown in the Custom Tiles factbox on the card and/or list page as a tile and on the card page as a field. Only supported for Decimal and Integer fields. |
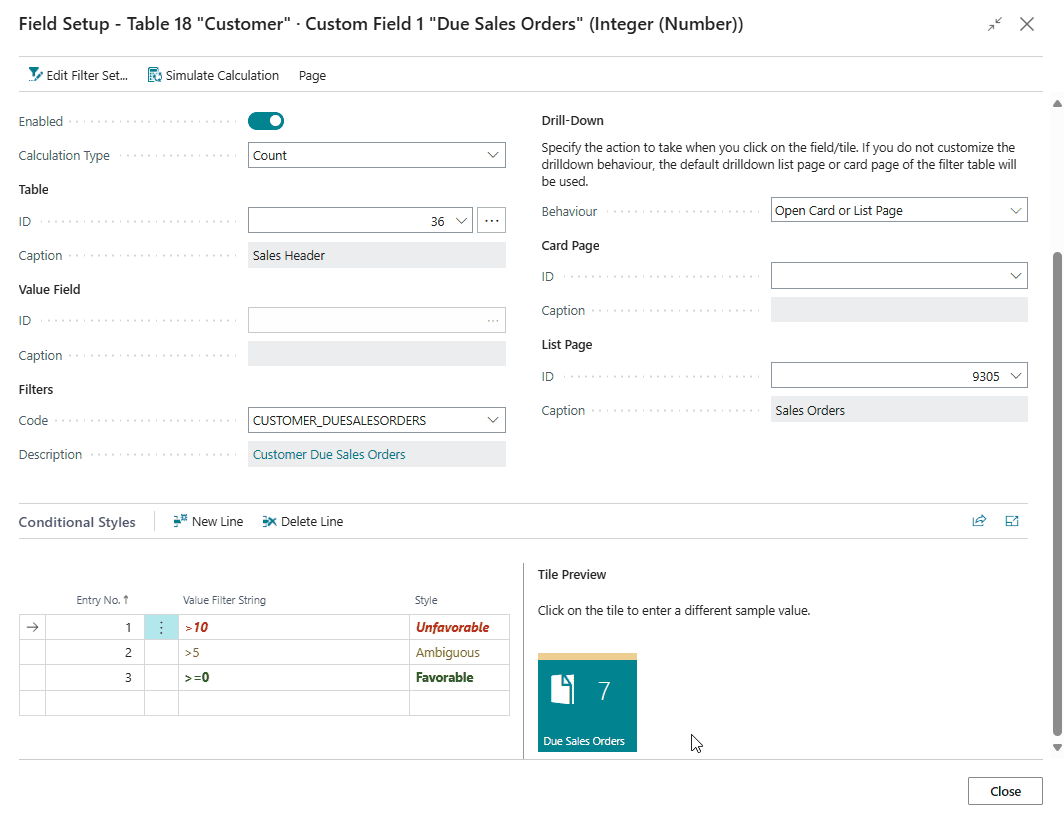
Drill-Down
You can use the settings in the Drill-Down group of the Field Setup page to configure what happens when users click on the field, tile or headline.
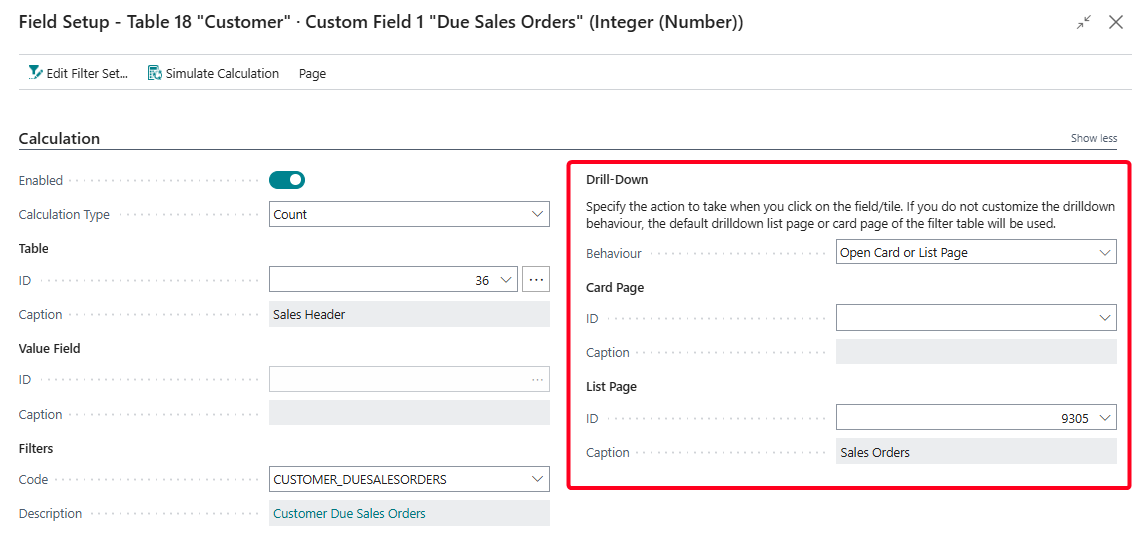
Open Card or List Page (Default)
This Drill-Down Behaviour opens either the card page or the list page depending on the number of records resulting from the filters:
- If the filters result in a single record, then the card page will be opened for that record when clicking on the field/tile.
- If the filters result in zero or multiple records, then the list page will be opened (with the filters from the filter set applied).
If you do not specify a card/list page explicitly, then the default card/list page for the filter table will be used. If you wish to customize which card and list page will be used, then you can specify a specific card and/or list page to use.
Open List Page
This Drill-Down Behaviour opens the list page, with the filters from the filter set applied to it.
If you do not specify a list page explicitly, then the default list page for the filter table will be used. If you wish to customize which list page will be used, then you can specify a specific list page to use.
Possibility to add new options
The Drill-Down Behaviour options can be extended by a developer (by extending the WSB_CFDrillDownBehaviour enum with a new option).
For example, you could add a new Hyperlink option which will open a specified URL when clicking on the field/tile.
If you have suggestions/ideas for new drill-down behaviours that you think should be supported by default, then please reach out to the Apportunix support team to share these ideas with us!
Hyperlink
When the Hyperlink drill-down behaviour is selected, one can provide a Web URL that will be opened when someone clicks on the calculated field/tile.
Additionally, the Web URL can contain a placeholder %1.
When this placeholder is used in the URL it will be substituted with the calculated value.
This can be useful, for example, when you want to navigate to an item's webshop page.
Composite Drill-Down Dialog
When you click on a field, tile or headline value that is calculated via a composite calculation (N.B., a calculation that uses Subcalculations), a dialog will be opened that provides you with insights on how the value was calculated. It shows you the subcalculation result values used to calculate the result.
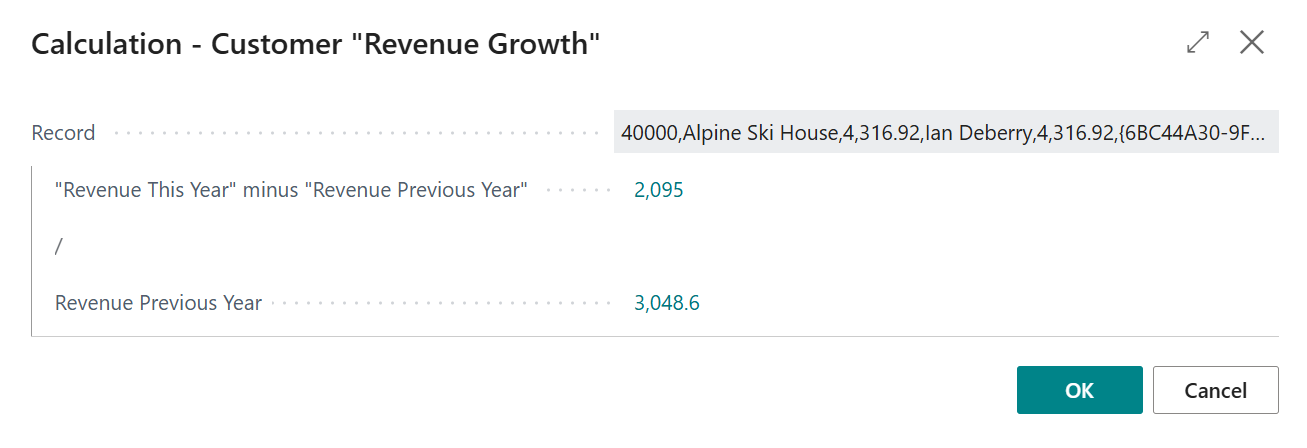
Note that you can drill-down further by clicking on the subcalculation field values to get further insights into how the subcalculation values are calculated.
Conditional Styles
For Decimal and Integer fields it is possible to configure the style/indicator color that is applied to the field/tile using the Conditional Styles tab on the Field Setup page.
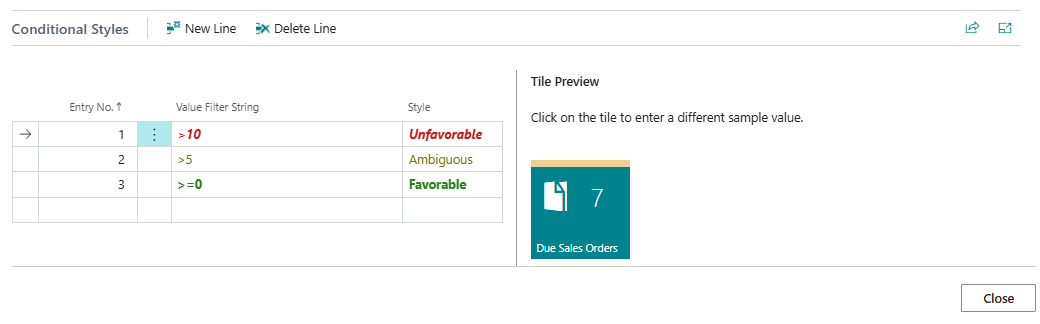
The conditional styles are processed based on their Entry No. The style of the first record for which the value falls in the specified filter is applied to the field/tile.
For example, if you have a field/tile to display the number of Due Sales Quotes, it is possible to define a Style (colour) when the count reaches a specific count.
Filtering is possible based on the standard Business Central filtering syntax (e.g. 1100..2100 for numbers 1100 through 2100, ..2500 for number up to and including 2500, <> for not equal to, > for "greater than", < for "less than", etc.).
For more information about the Business Central filtering syntax, please see the Sort, search, and filter data in lists, reports, or XMLports on Microsoft Learn.
Tip
For fields displayed as tiles, you can click on the Preview Tile on the right to change the sample value to a different value. This way you can test which style will be applied for the sample value that you entered.
The tile in this page part looks a bit different than the tile in your role center. This is something that is 'by design' in Microsoft Dynamics 365 Business Central.
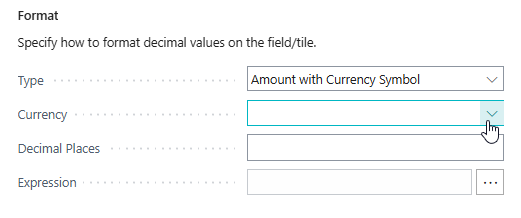
Decimal Format
For Decimal fields you can customize the formatting, with the following options available:
| Format Type | Description |
|---|---|
| Default | The default formatting for decimal fields in Business Central. |
| Amount with Currency Symbol | The decimal field is formatted with a currency symbol. The currency symbol that is used is that of the Local Currency defined in the General Ledger Setup. The decimal places/points are taken from the Amount Decimal Places (LCY) setting in the General Ledger Setup. It is possible to override the Currency and/or Decimal Places that will be used for the formatting of the field. |
| Unit Amount with Currency Symbol | The decimal field is formatted with a currency symbol. The currency symbol that is used is that of the Local Currency defined in the General Ledger Setup. The decimal places/points are taken from the Unit Amount Decimal Places (LCY) setting in the General Ledger Setup. It is possible to override the Currency and/or Decimal Places that will be used for the formatting of the field. |
| Percentage | The decimal field is interpreted as a percentage. A value between 0 and 1 is expected. For example, the value "0.42" will be displayed as "42%". |
| Custom | Use a custom Expression to define the formatting for the decimal field. For more information on the syntax for these expressions, please consult the Formatting decimal values documentation on Microsoft Learn. |
Negate Value
For Boolean, Decimal and Integer (Number) fields you can negate/invert the calculation result value by enabling the Negate Value setting on the Field Setup page.

-
For a Boolean field,
falsewill becometrueand vice versa.The setting is available when the Calculation Type = Exists.
-
For a Decimal or Integer (Number) field a positive value will become a negative value and vice versa.
The setting is available when the Calculation Type = Sum.
Subcalculations
Some calculation types require subcalculations to calculate the end-result. For example Calculation Type = Division requires the calculation of a Numerator and Denominator component.
You can set up and reuse subcalculations to configure how these components need to be calculated. A great example of this can be found in the Example 5. Composite Calculation "Revenue Growth" on Customer Card/List section.
Note
When subcalculations are reused, then subcalculation values are cached/stored rather than unnecessarily recalculated. This improves the calculation time for the field calculation.
The cache is cleared with each field calculation.
Comparison Methods
When Calculation Type = Comparison is used for a field-calculation, there are multiple comparison methods that can be used.
The list of currently supported comparison methods is as follows:
| Comparison Method | Description | Supported Data Types |
|---|---|---|
= (Equal) |
Check if two values are equal. | All |
<> (Not Equal) |
Check if two values are not equal. | All |
> (Greater Than) |
Check if one value is greater than another value. | Decimal, Integer |
>= (Greater Than or Equal) |
Check if one value is greater than or equal to another value. | Decimal, Integer |
< (Less Than) |
Check if one value is less than another value. | Decimal, Integer |
<= (Less Than or Equal) |
Check if one value is less than or equal to another value. | Decimal, Integer |
| Contains | Checks if one text contains another text. | Code, Text |
| Starts with | Checks if one text starts with another text. | Code, Text |
| Ends with | Checks if one text ends with another text. | Code, Text |
Simulate Calculations
On the Custom Fields Definitions page, you can use the Simulate Calculations action to simulate calculations for all the calculated fields of a selected table record.

This is a useful tool to directly view the calculation outputs for all of your calculated custom fields:
Examples
1. "First Sales Order No."
In this example we are going to look at adding a First Sales Order No. field for entity table = Customer, which looks up the first sales order for the customer. To achieve this, we can follow these steps:
- Open the Custom Fields Definitions page.
-
Set up a custom field for:
- Entity = Customer,
- Type = Code, and
- Field Name = First Sales Order No.
Please note that you may need to close your current Business Central session and open a new one before the custom field will show up with the appropriate caption/translations.
-
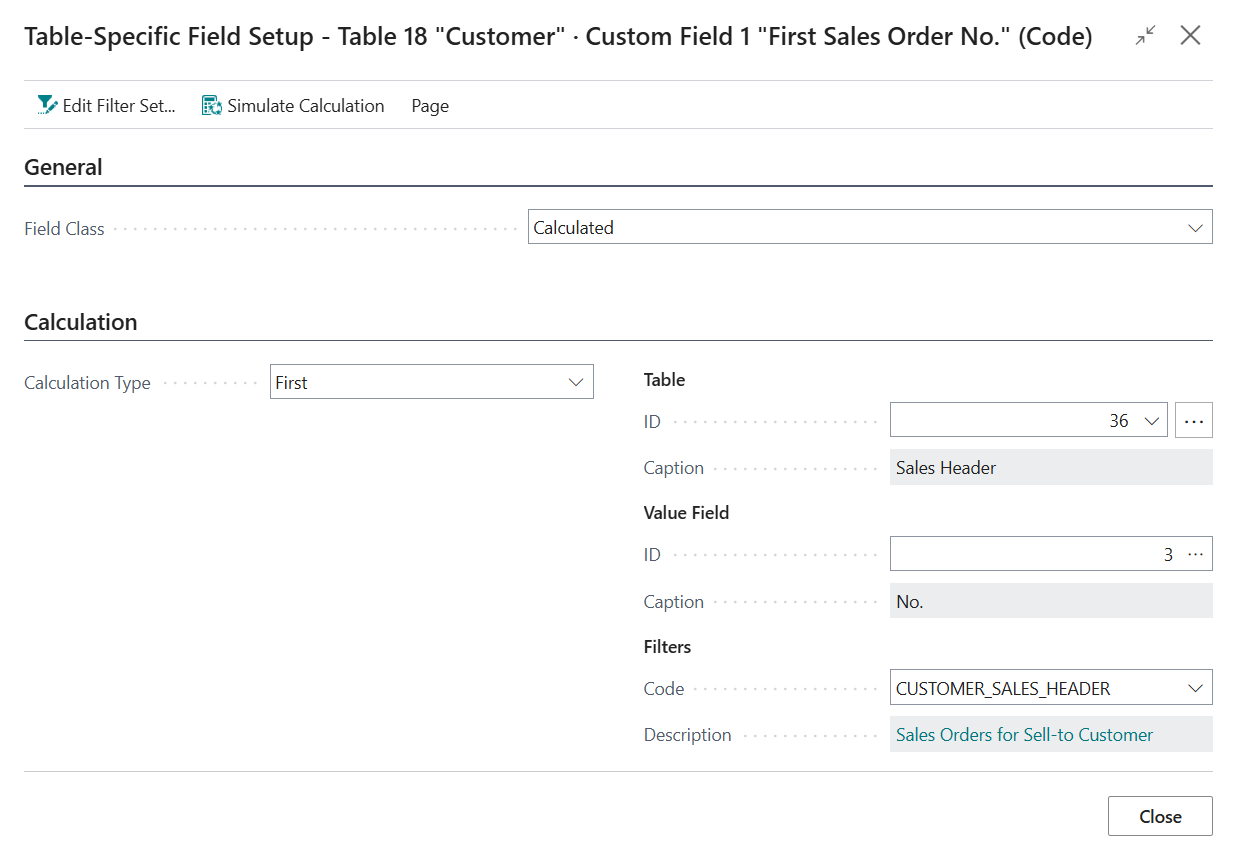
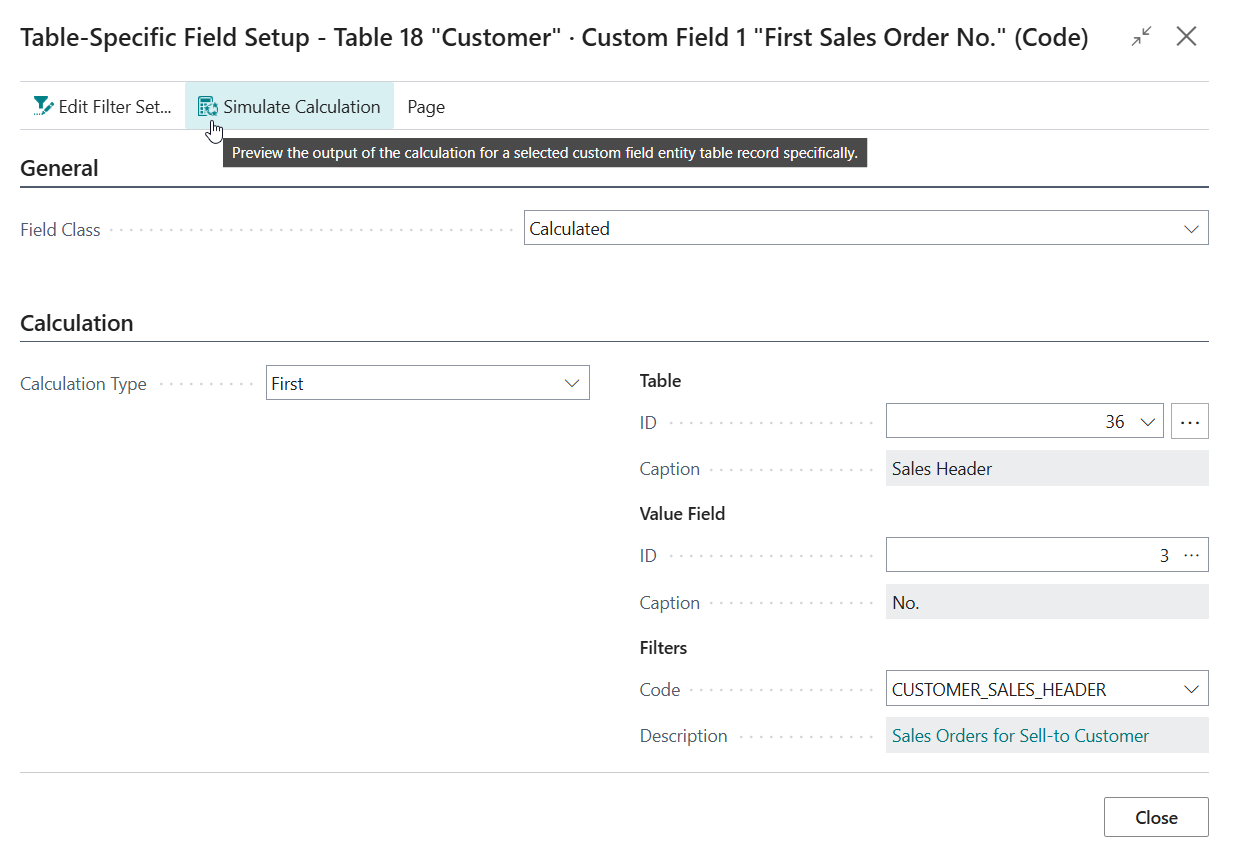
With the new custom field selected, invoke the Calculations action to open the Table-Specific Field Setup page for the custom field.
- Change the Field Class from Normal to Calculated
- Set Calculation Type to First, as we want the calculated field to use the first record within our filters.
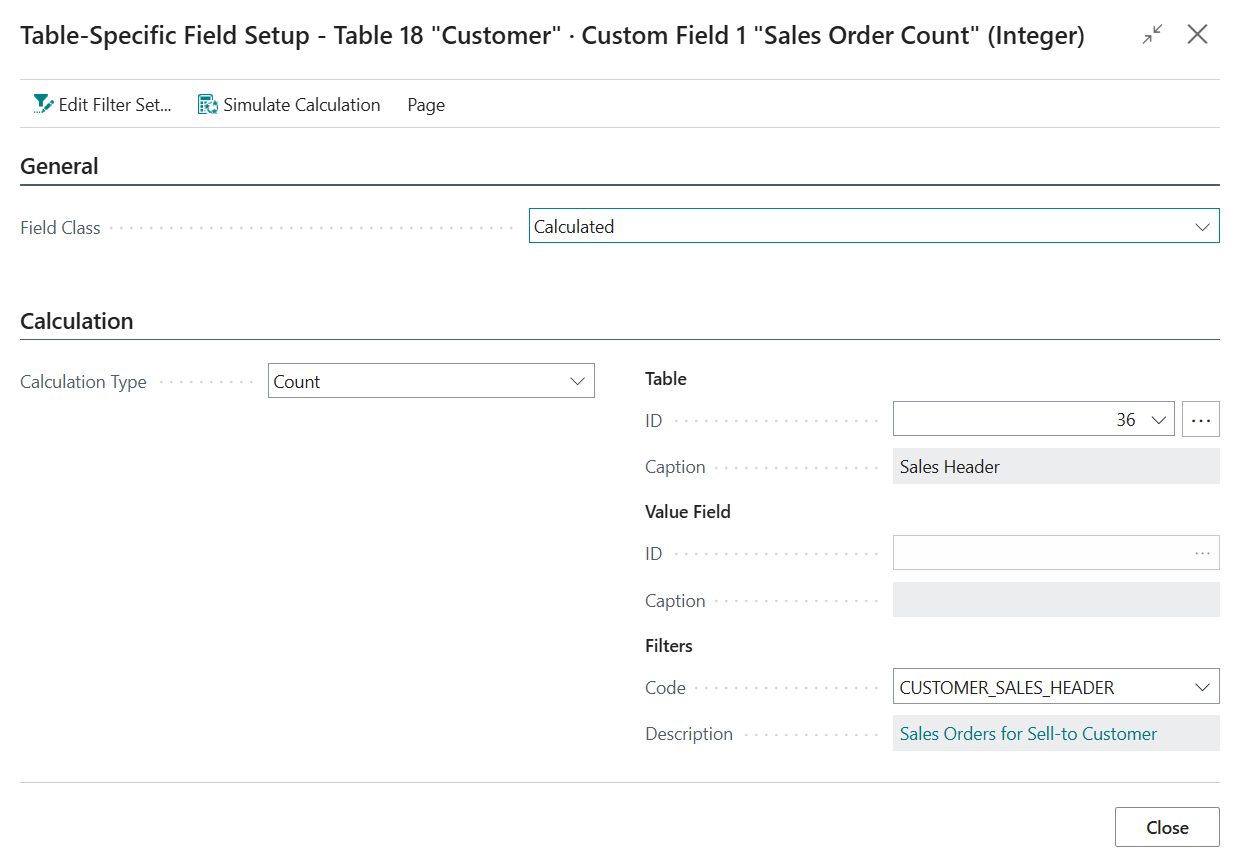
- Set the table to use to table 36 "Sales Header", as this table contains the headers of (unposted) sales documents, including sales orders.
-
Set the field to use to field 3 "No.", as we want the calculated field to retrieve the "No." of the first Sales Order.
-
Create a new Filter Set to set up a link between the Customer table records and Sales Header table records:
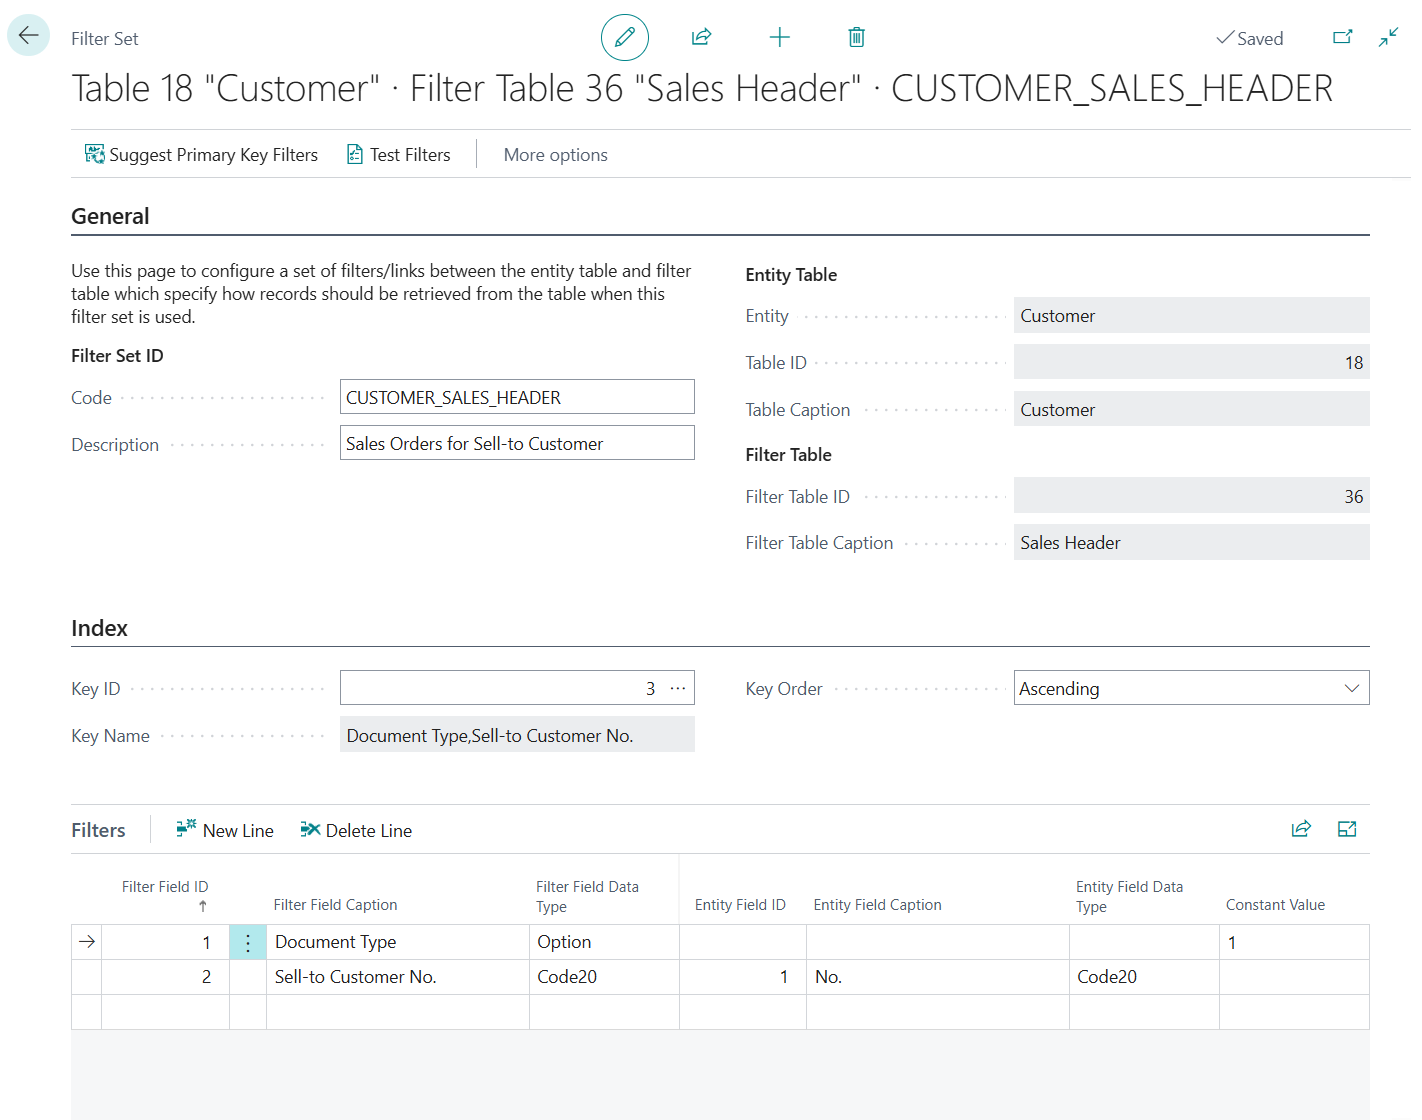
-
Provide a Code and Description for the Filter Set, e.g.:
- Code =
CUSTOMER_SALESORDERS - Description = "Sales Orders for Sell-to Customer"
- Code =
-
Set up a filter to limit the results to Sales Orders only:
- Filter Field = 1 "Document Type"
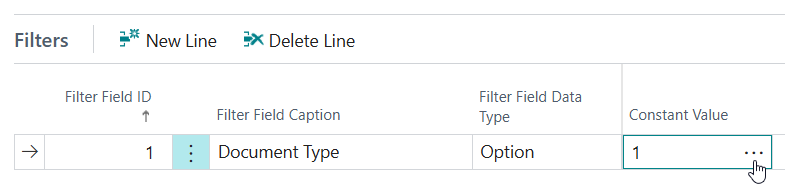
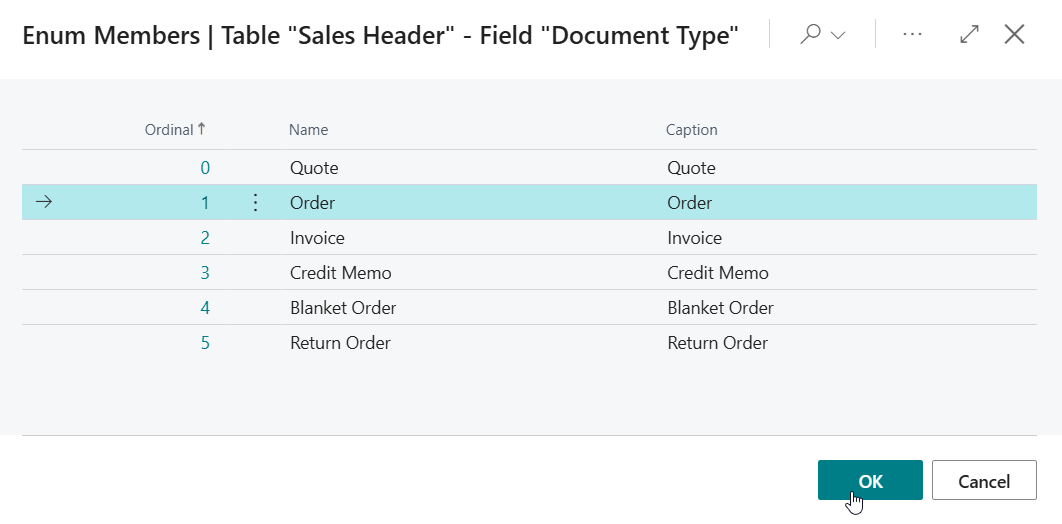
- Constant Value = 1 (Order)
Tip: Use the Assist-Edit () button of the Constant Value field to get the ordinal/number value of Document Type = Order for the filter.
-
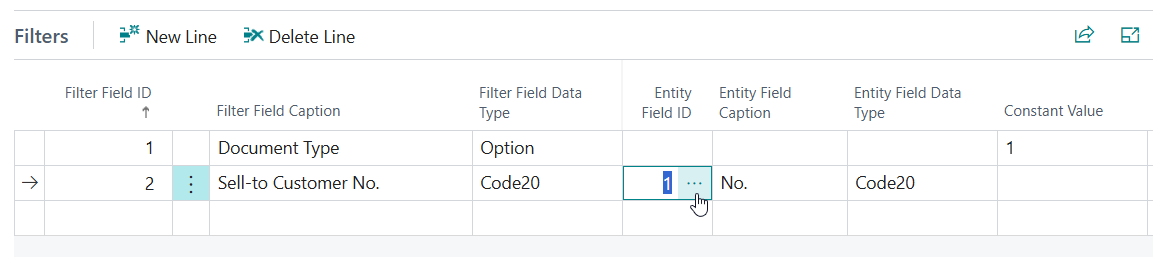
Set up a filter to limit the results to Sales Orders for a single customer:
- Filter Field = 2 "Sell-to Customer No."
-
Entity Field = 1 "No."
-
On the Index tab use the Assist-Edit () button of the Key ID field to select a key/index of the Sales Header table to use for this filter set.
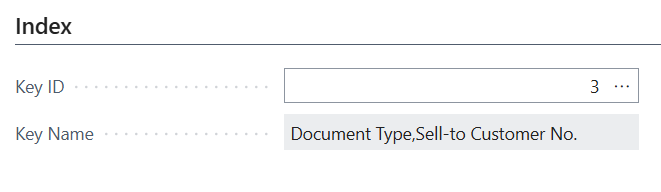
As we are filtering on the Document Type and Sell-to Customer No. field, key 3 on "Document Type","Sell-to Customer No." is the most appropriate in this case.
-
-
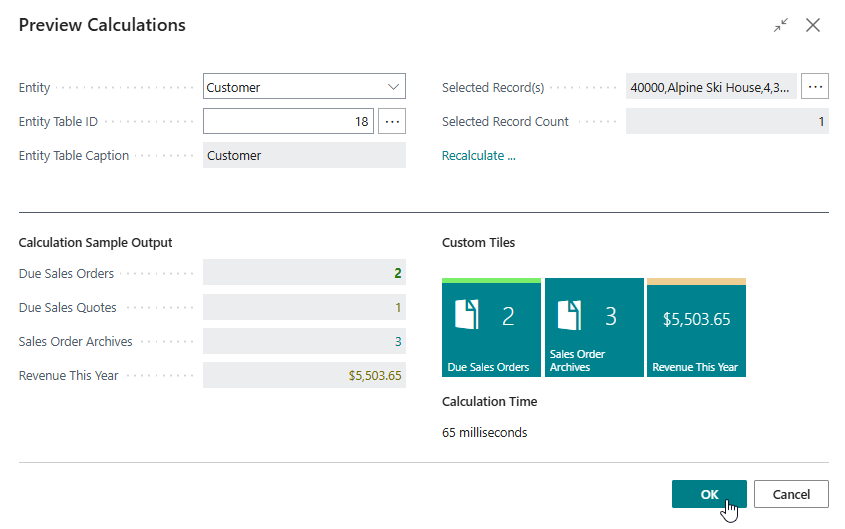
On the Table-Specific Field Setup page invoke the Simulate Calculation action to confirm the output is as expected.
-
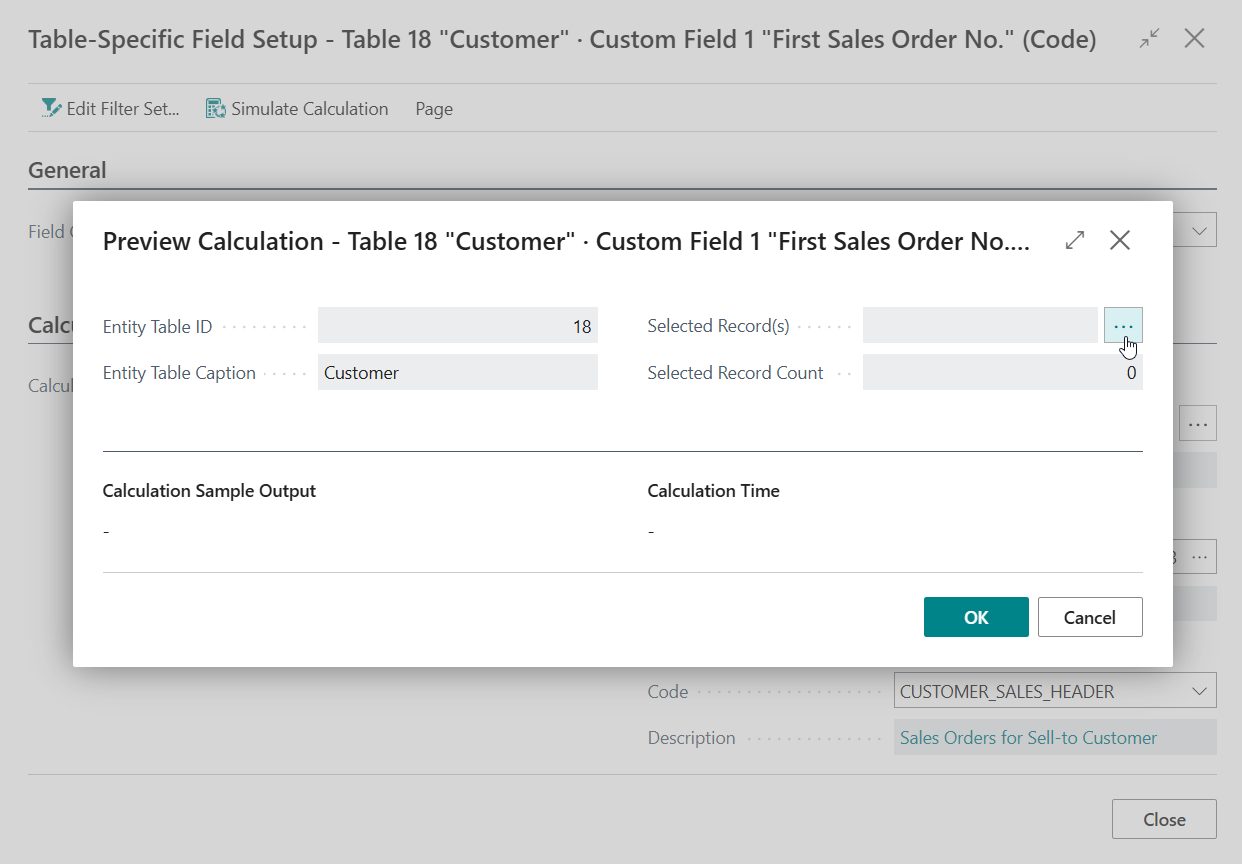
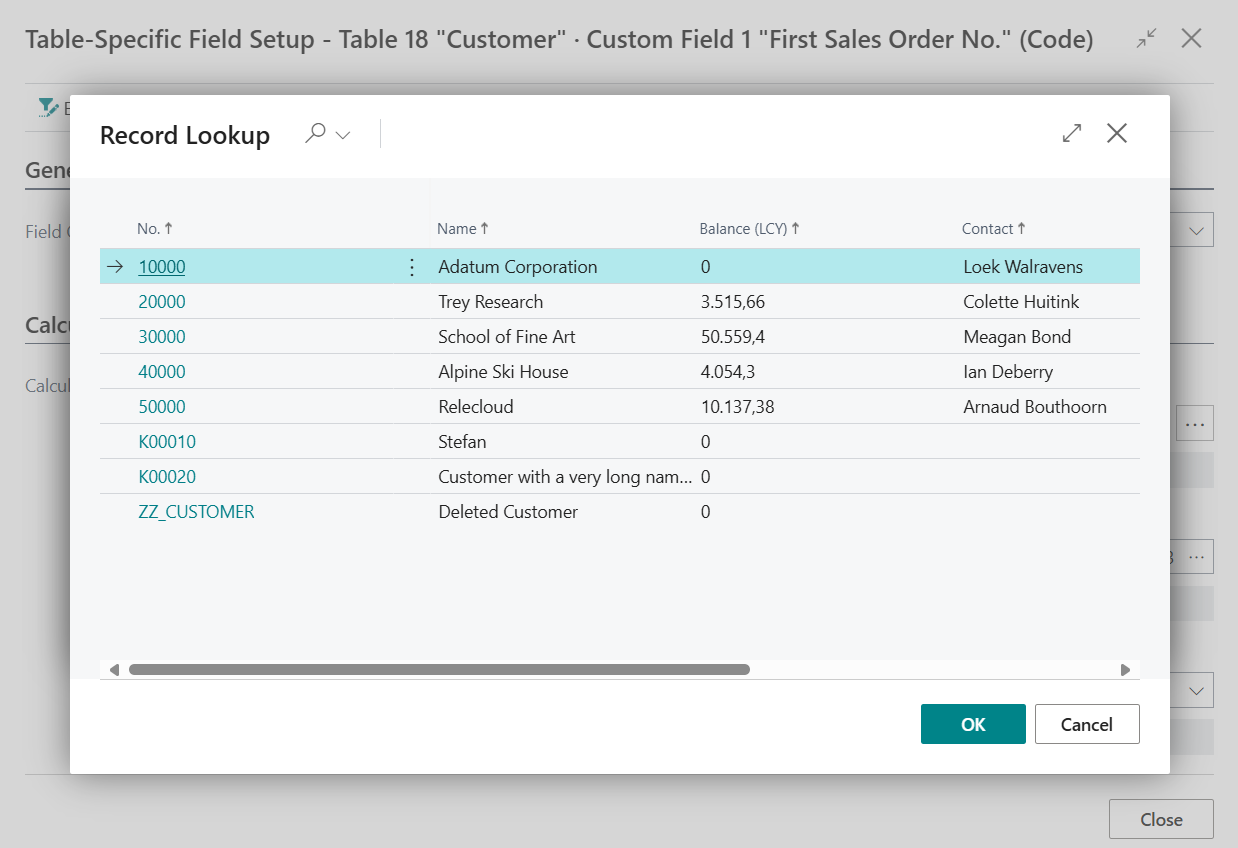
Use the Assist-Edit () button of the Selected Record(s) field to select a Customer record to test the calculation.
-
Select one of the Customer records and choose OK.
-
Below the Calculation Sample Output label you will now find the calculated output for the custom field.
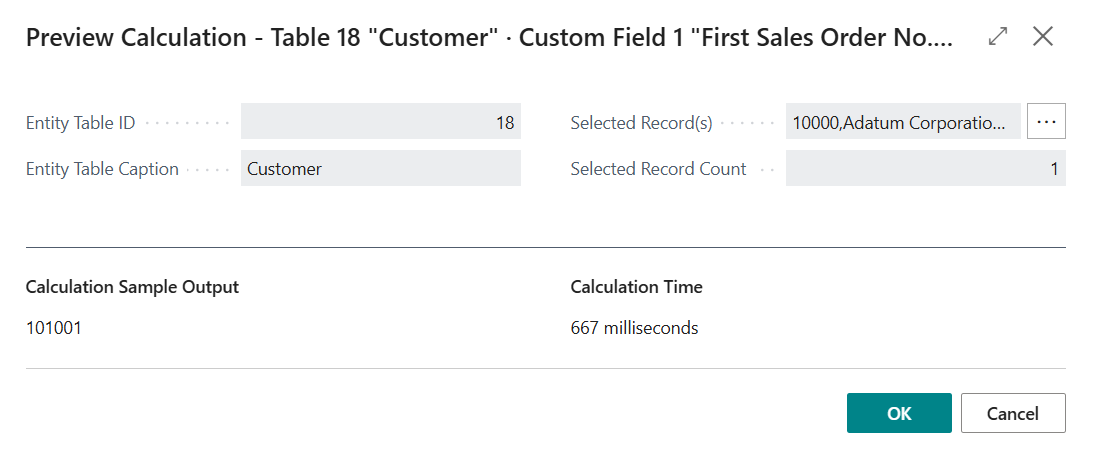
Additionally, below the Calculation Time label you will find a measurement of the time it took to calculate the output. Please note that the calculation time is dependent on multiple factors but is important to keep in mind as you should avoid that your calculated fields decrease performance of Business Central and lead to users waiting a long time for pages to load.
-
If you wish you can repeat the simulation with other records to check if the outputs are as expected. After you are done, choose OK to close the page.
-
-
Finally, navigate to the Customer Card of one of the customers in your Business Central environment and find the calculated field(s) that we have added:
Note that you can also drill-down on each of the calculated fields to open a page to view the calculation's related record(s).
Note
Custom calculated fields are not visible on list pages as page fields.
However, you can make calculated fields visible on the Custom Tiles factbox as FactBox Field or Tile for the selected record on the list page. For this, change the Display Type of the calculated field to FactBox Field, Tile or Page Field and Tile.
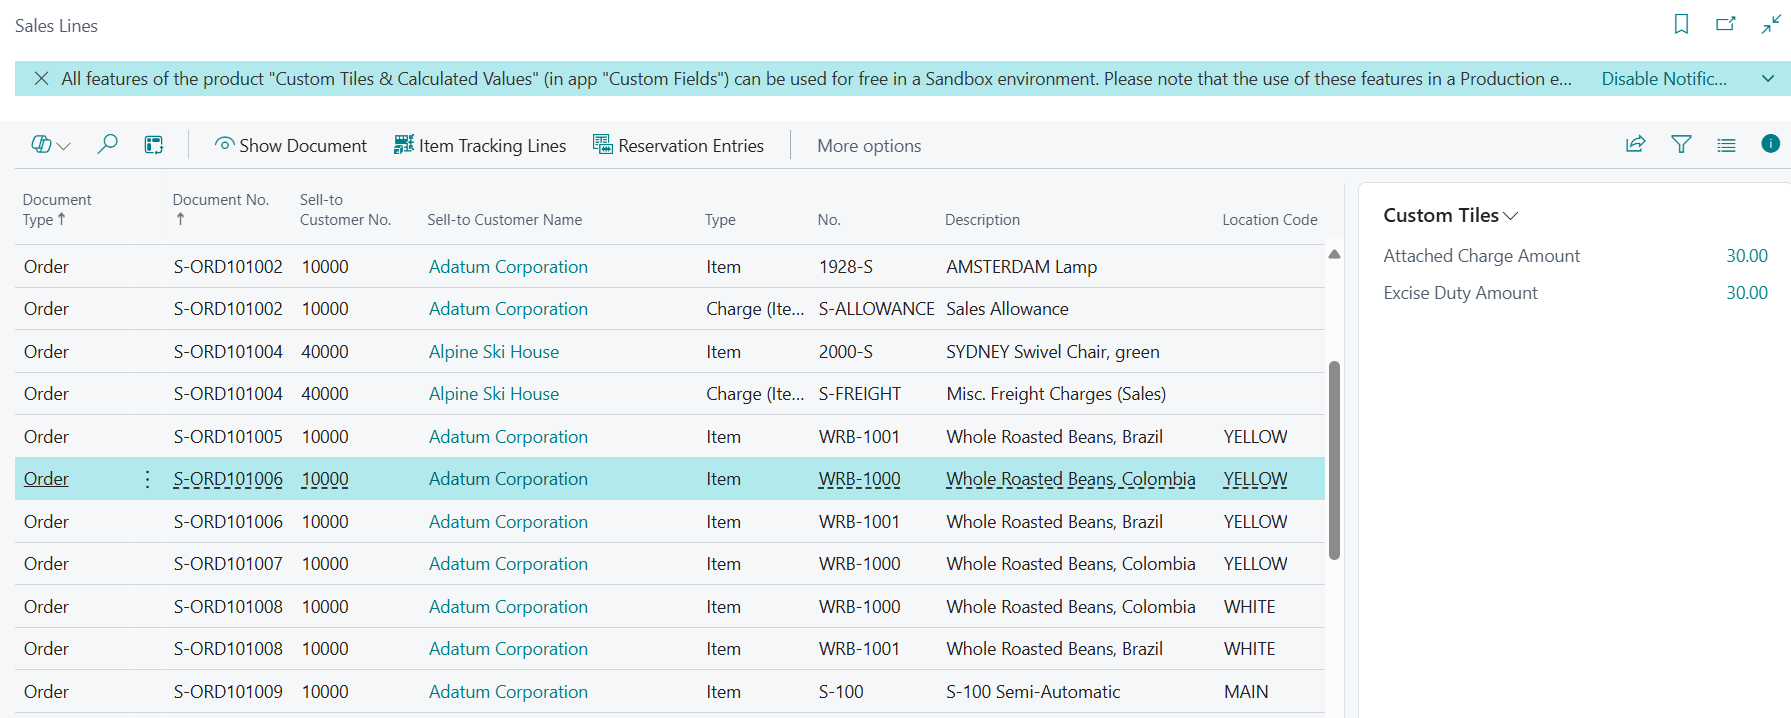
For example, you can define custom calculated fields for the Sales Line entity and view the calculation results in the Custom Tiles factbox on the Sales Lines list page:
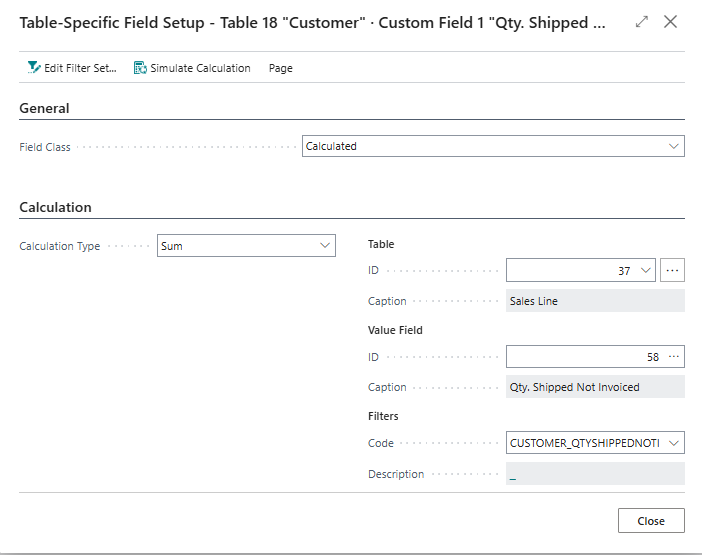
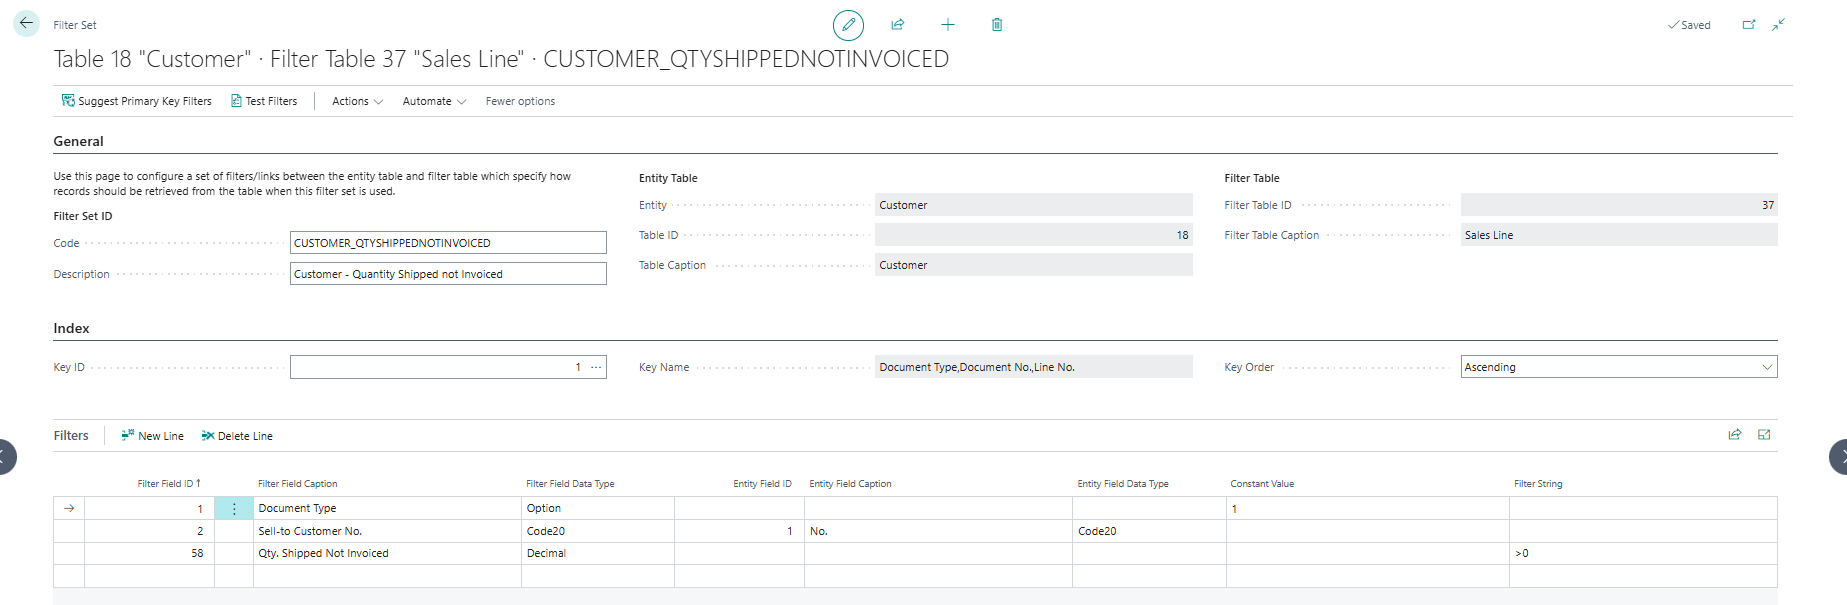
2. "Qty. Shipped Not Invoiced"
In this example we are going to look at adding a Qty. Shipped Not Invoiced field for entity table = Customer, which "sums the quantity of Qty. Shipped Not Invoiced from the Sales Order lines for the customer". To achieve this, we follow the steps as described in First Sales Order No with the following additions.
-
Set up a custom field for:
- Entity = Customer,
- Type = Decimal, and
- Field Name = Qty. Shipped Not Invoiced
-
Use the following Table-Specific Field Setup
-
Use the following Filter Set
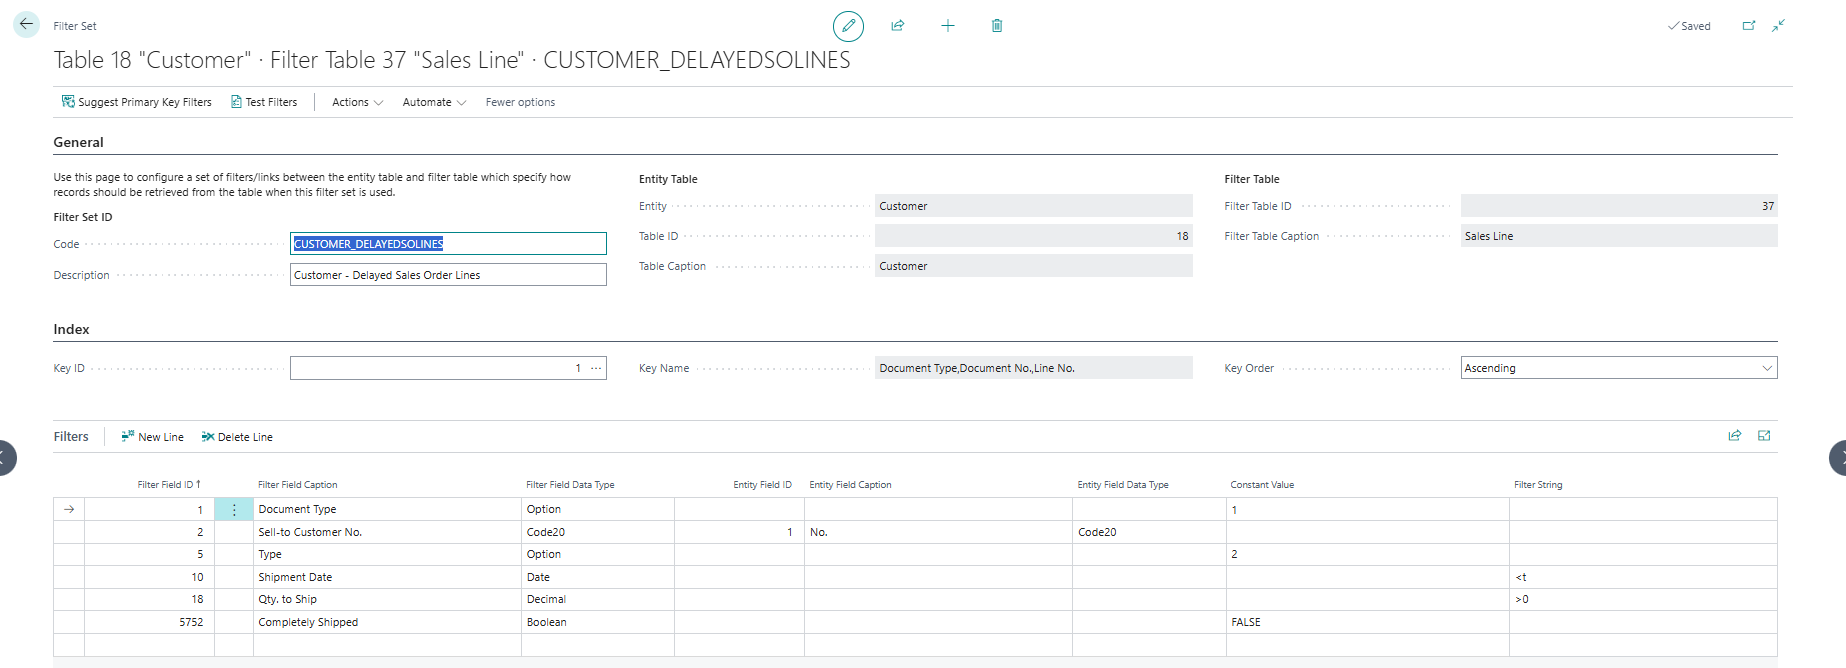
3. "Delayed Sales Order lines"
In this example we are going to look at adding a Has Delayed Sales Order Lines field for entity table = Customer, which "sets a boolean to TRUE if the Customer has one or more Sales Order lines which are delayed". To achieve this, we follow the steps as described in First Sales Order No with the following additions.
-
Set up a custom field for:
- Entity = Customer,
- Type = Boolean, and
- Field Name = Delayed Sales Order lines
-
Use the following Filter Set
4. Tile "Due Sales Quotes" on Customer Card/List
In this example we are going to look at adding a Due Sales Quotes tile for entity table = Customer. The tile must show a count of Sales Quotes that are past due for quotes where the selected customer is the Sell-to Customer. When clicking on the tile, the drill down must always go to the Sales Quote List Page with an overview of the filtered values:
- Set up a custom calculated field:
- Entity = Customer
- Type = Integer (Number)
- Field Name = Due Sales Quotes
- Click on Calculations
- Set Field Class = Calculated
- Set Display Type = Tile
- Set Calculation Type = Count
- Table ID is
36(Sales Header) - Create the following Filter Set:
- Code is suggested automatically, but the recommendation is to choose a descriptive code, e.g.,
CUSTOMER_DUESALESQUOTES - Give the filter set a recognizable Description, e.g., "Customer Due Sales Quotes"
- In this case we choose under Index the Key ID 1 which is
Document Type,No. - Select the right Filters, for this scenario, set them as follows:
- Field ID
1Document Type set to filter on Constant Value =0(Quote) - Field ID
2Sell-to Customer No. must be linked to Entity Field ID =1(No.) - Field ID
152Quote Valid To Date set to filter on Filter String =..TODAY
- Field ID
- Code is suggested automatically, but the recommendation is to choose a descriptive code, e.g.,
- Under Drill-Down you must specify the right Behaviour, in this case we always want to open the "Sales Quote List" page, so the Behaviour in this case must be Open List Page, as the List Page you can select ID =
9300"(Sales Quotes"). - Now the Customers list page and the Customer Card page have a new tile called Due Sales Quotes visible in the Custom Tiles factbox.
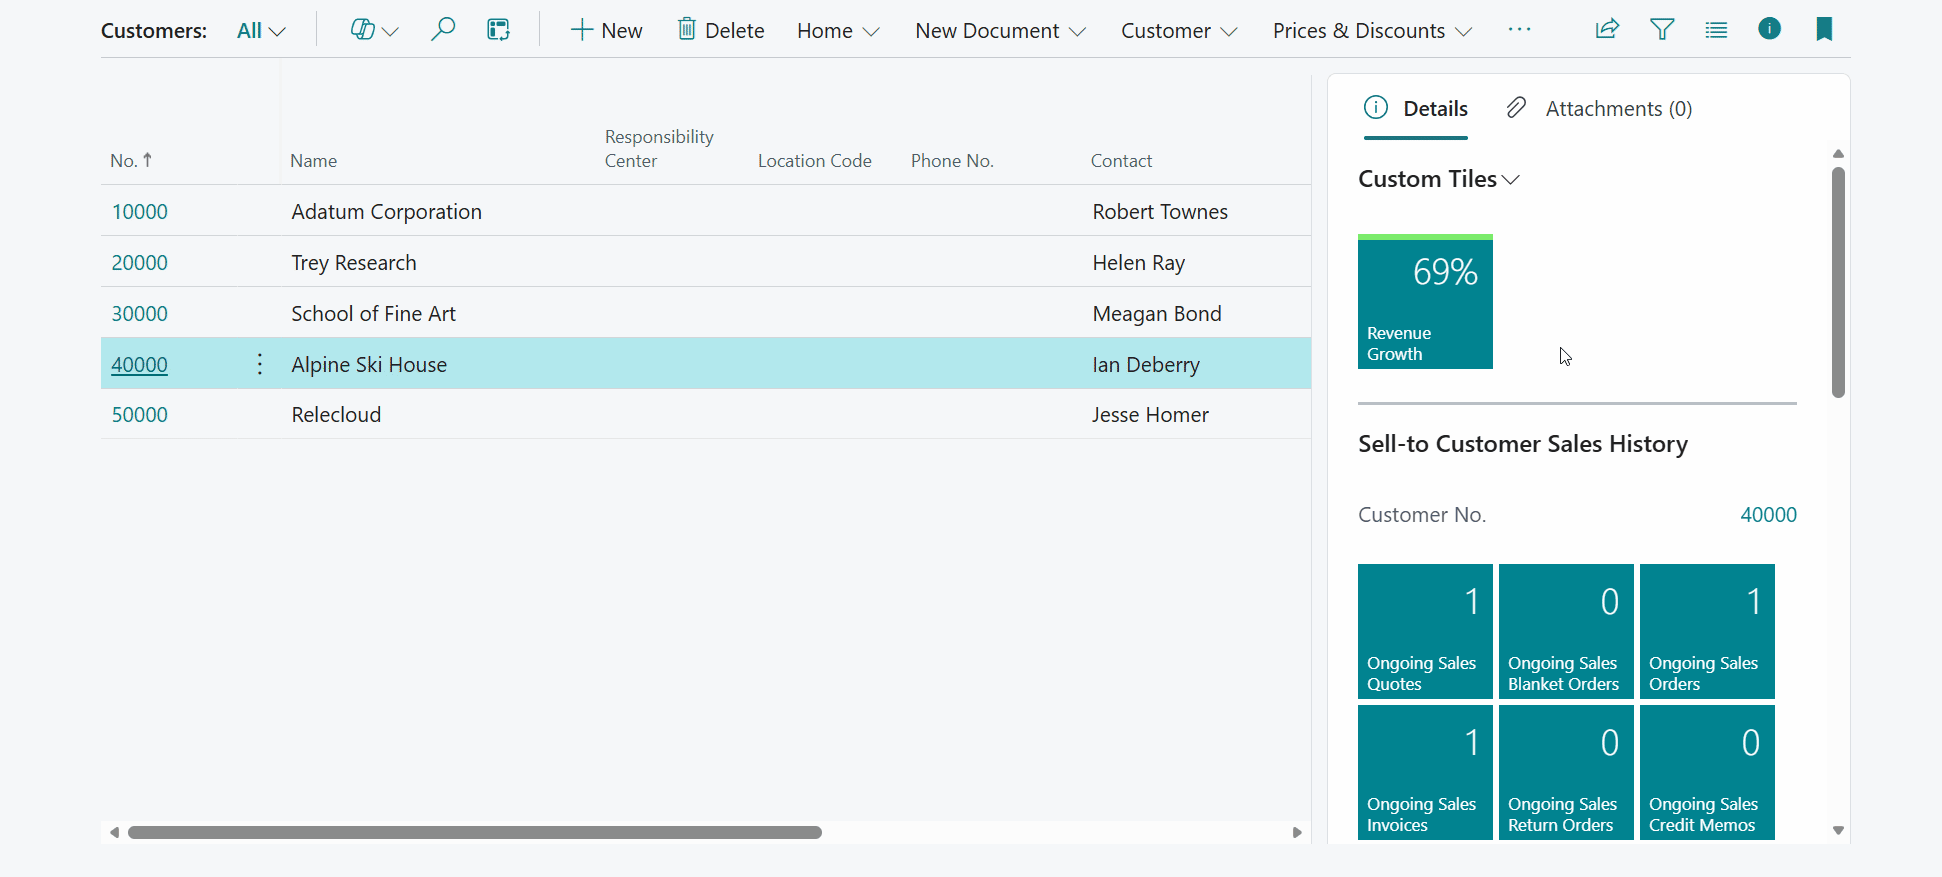
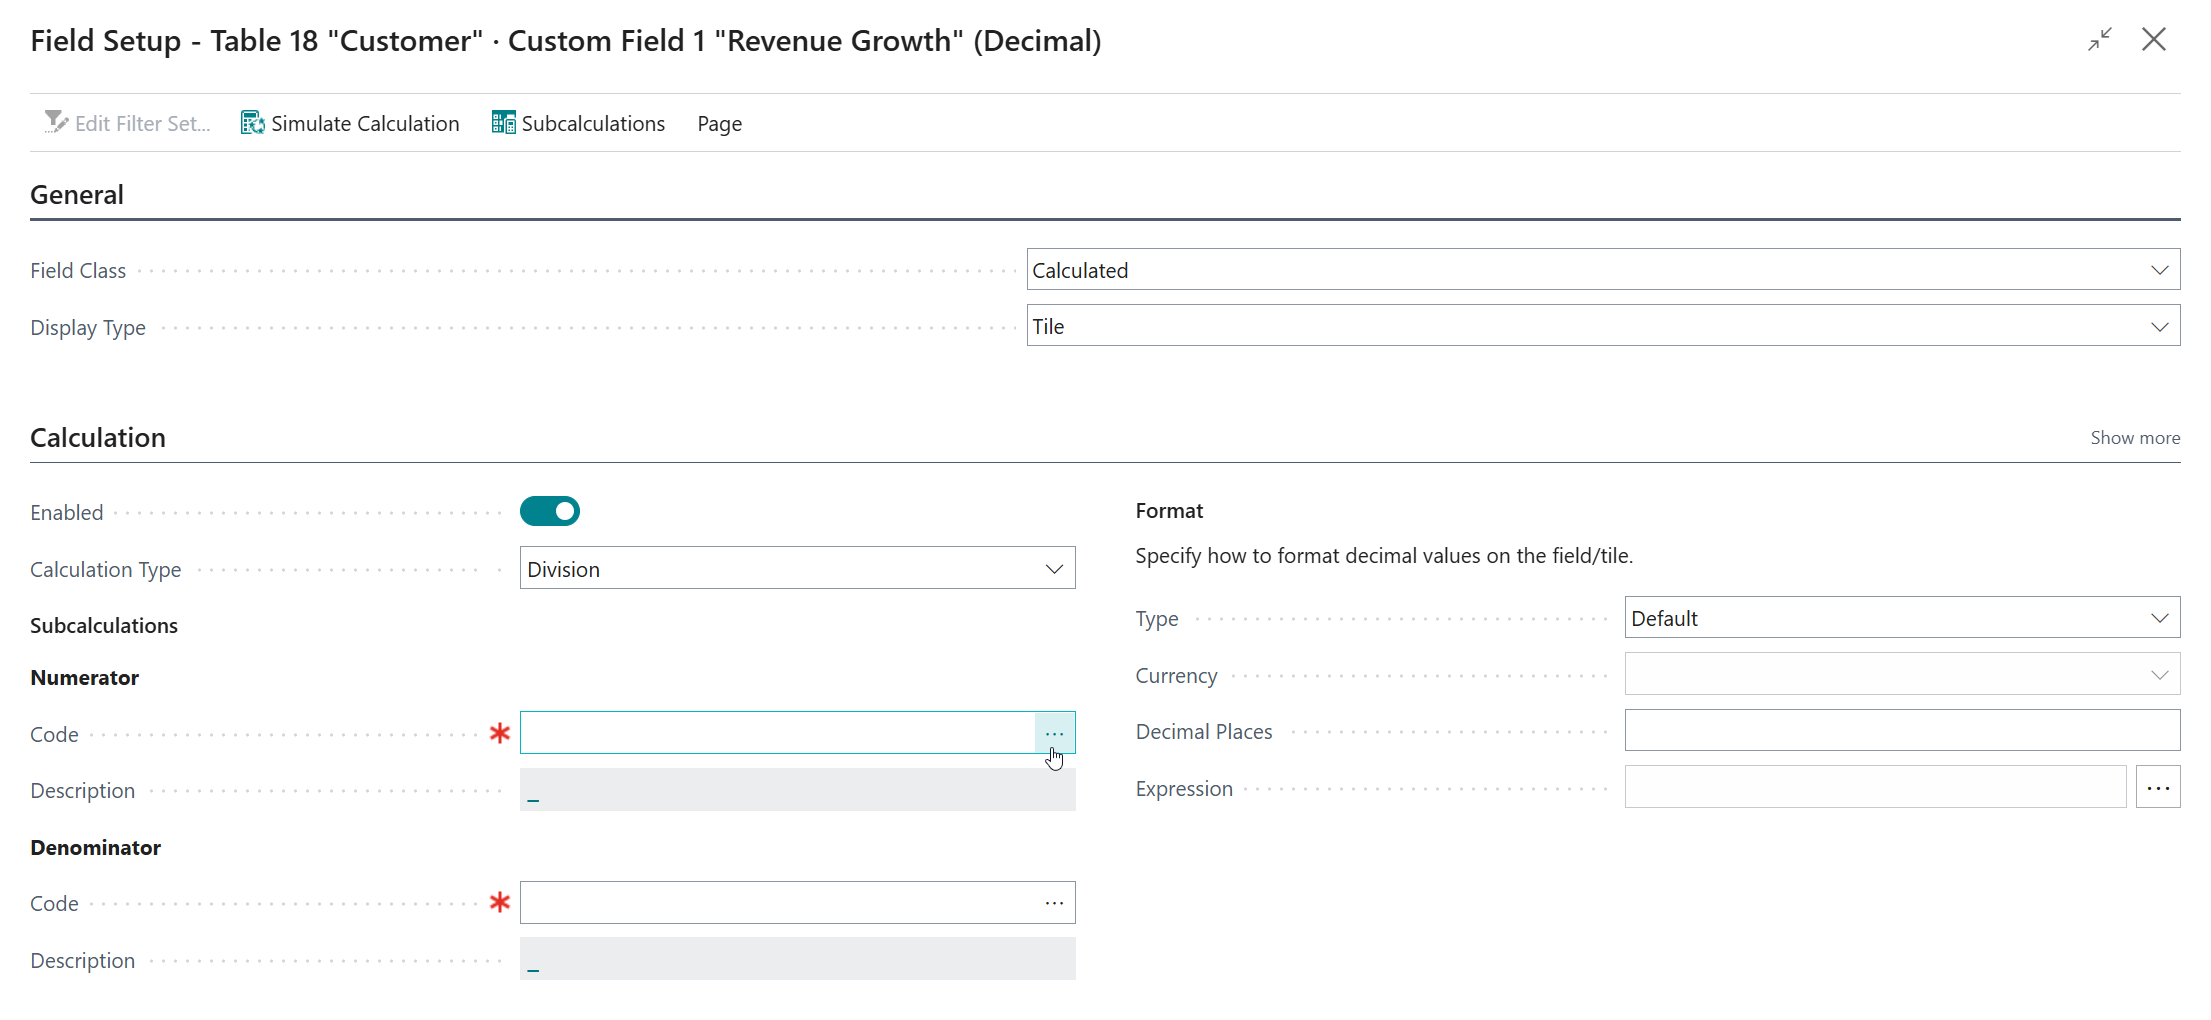
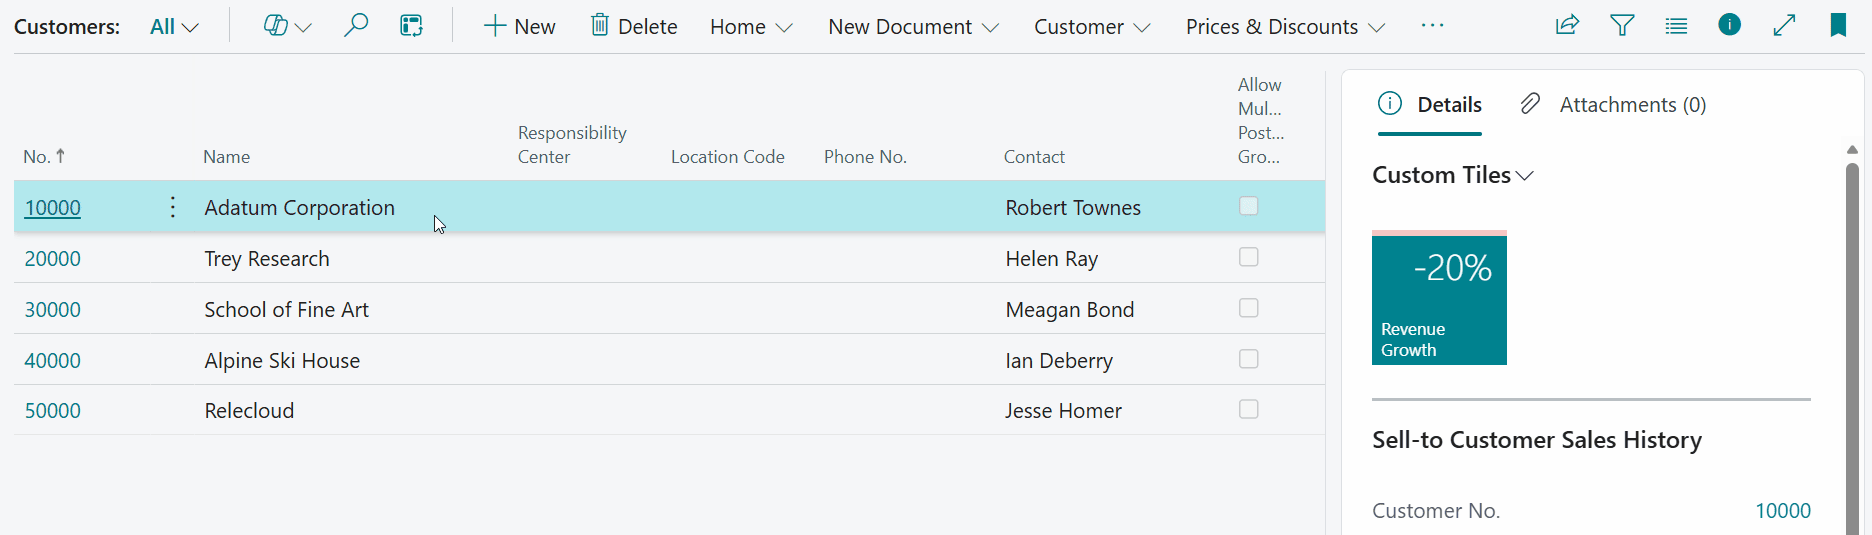
5. Composite Calculation "Revenue Growth" on Customer Card/List
In the following example we are going to look at adding a Revenue Growth tile that will be visible on the Customer Card/List page.
The tile will show a percentual growth of the Profit from the selected customer when comparing the aggregated profit (based on invoices & credit memos) from this year against the aggregated profit from the previous year. The percentual growth should be calculated as follows:
The resulting decimal value should be formatted as a percentage, e.g., when the outcome is 0.42, it should be displayed as \(42\%\) on the tile.
To achieve this, the calculated field is set up as follows:
- Open the Custom Fields Definitions page.
-
Set up a custom calculated field:
- Entity = Customer
- Type = Decimal
- Field Name = Revenue Growth
-
Click on the Calculations action to configure the calculation.

-
Set Field Class = Calculated.
- Set Display Type = Tile
-
Set Calculation Type = Division
-
When we choose Division as the calculation type, we need to provide two subcalculations, i.e., the numerator and the denominator.
-
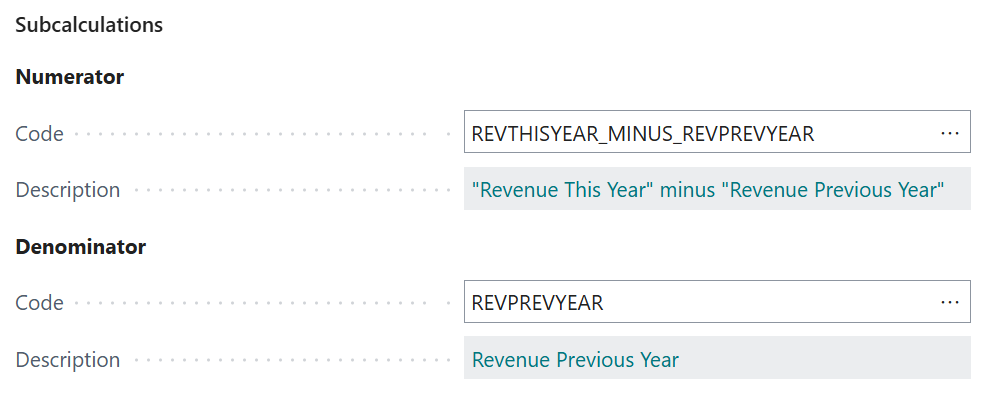
5.1. Numerator ("Revenue This Year" - "Revenue Previous Year")
First, we are going to configure the numerator calculation, which will calculate the following mathematical expression:
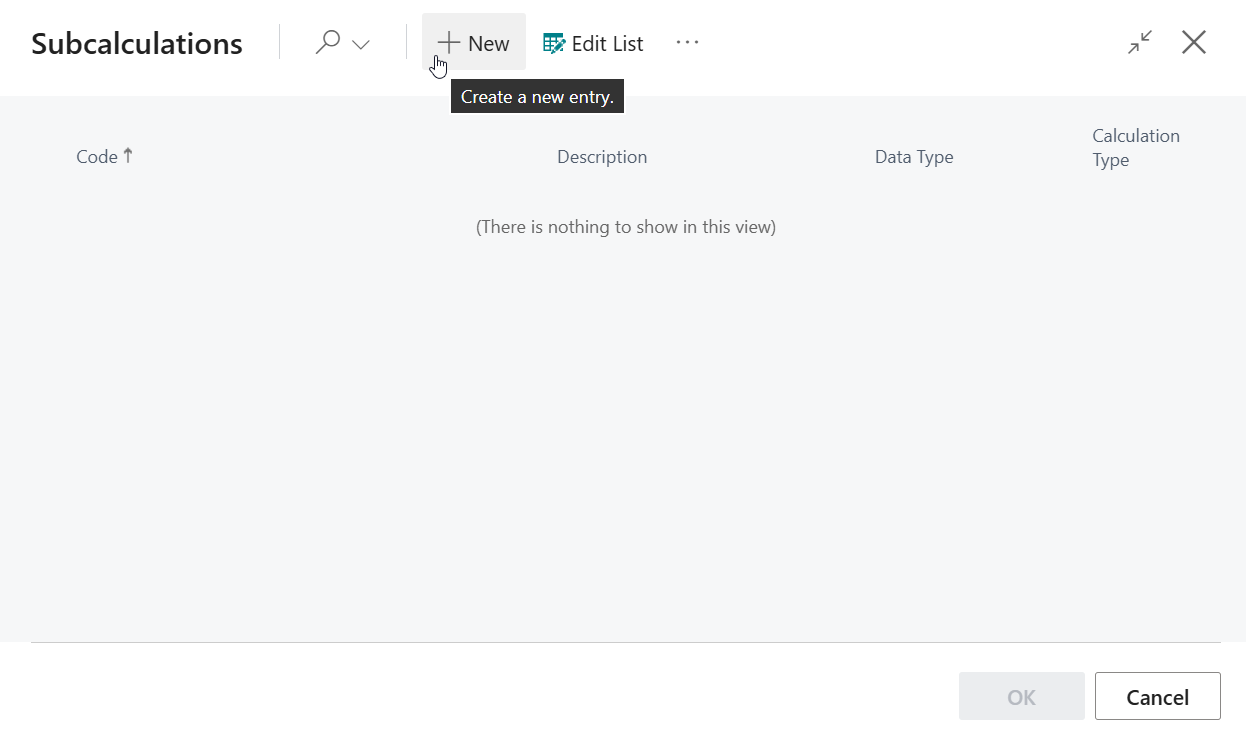
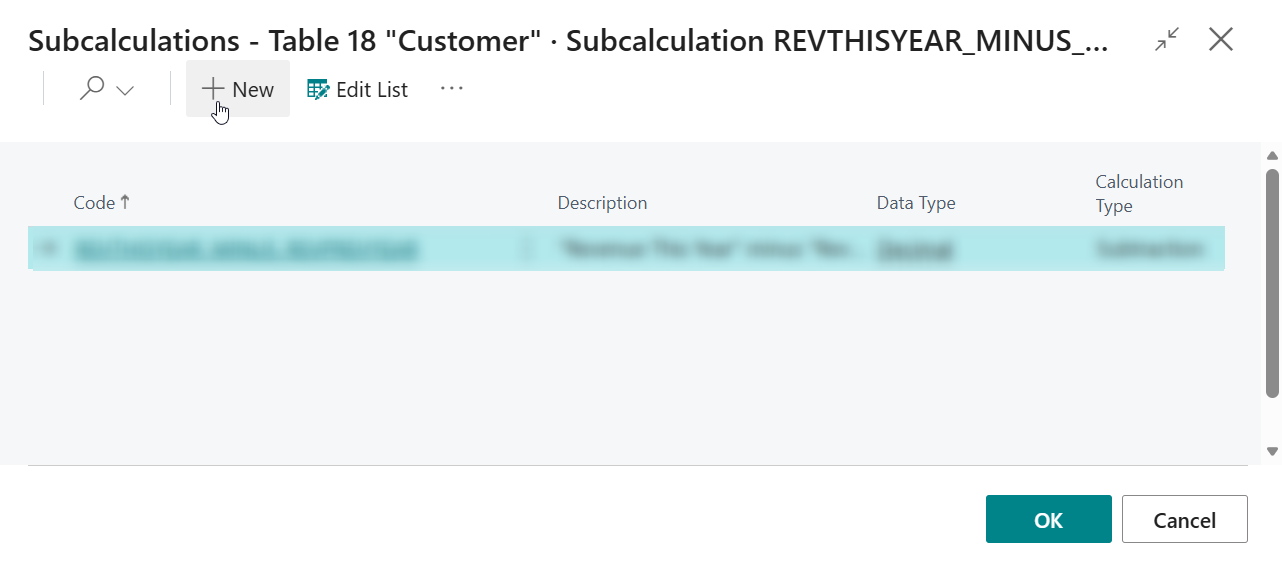
\[ \text{“Revenue This Year”} - \text{“Revenue Previous Year”} \]On the Numerator - Code page field, click on the Assist-Edit () button to set up the subcalculation to use.
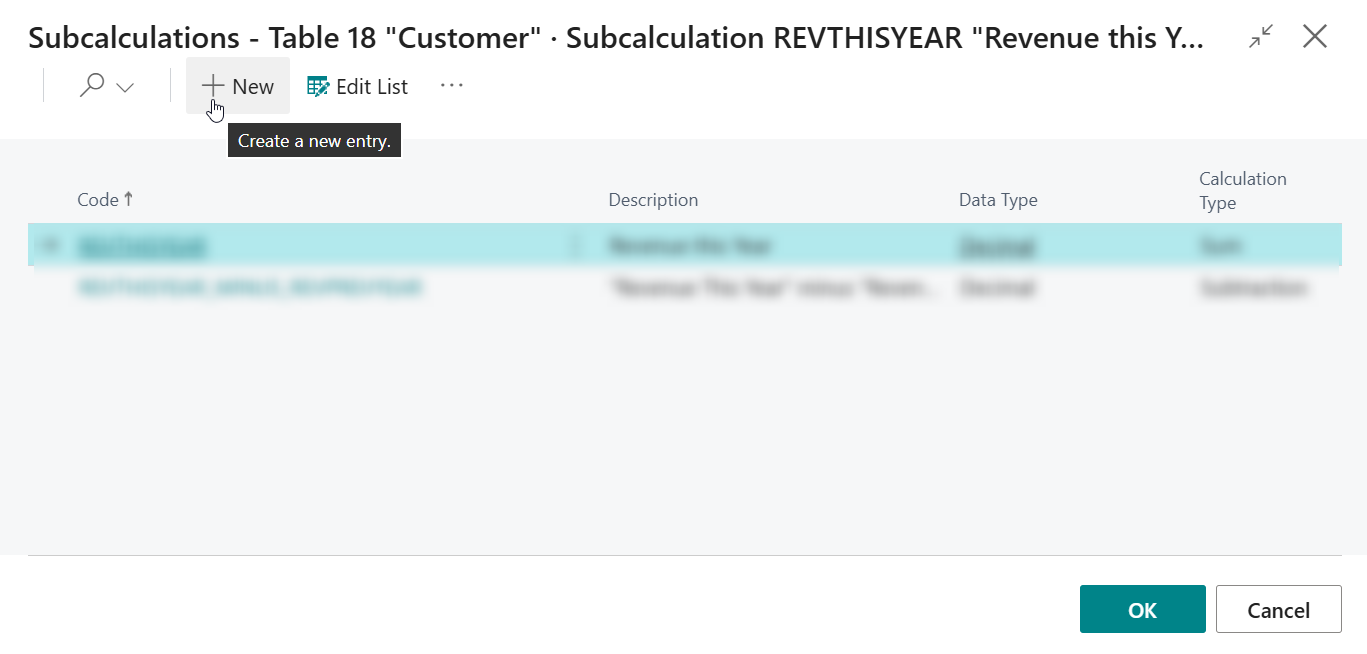
On the page that opens, invoke the New action to create and configure a new subcalculation.
Configure the new subcalculation as follows:
- Code =
REVTHISYEAR_MINUS_REVPREVYEAR - Description =
"Revenue This Year" minus "Revenue Previous Year" - Calculation Type = Subtraction
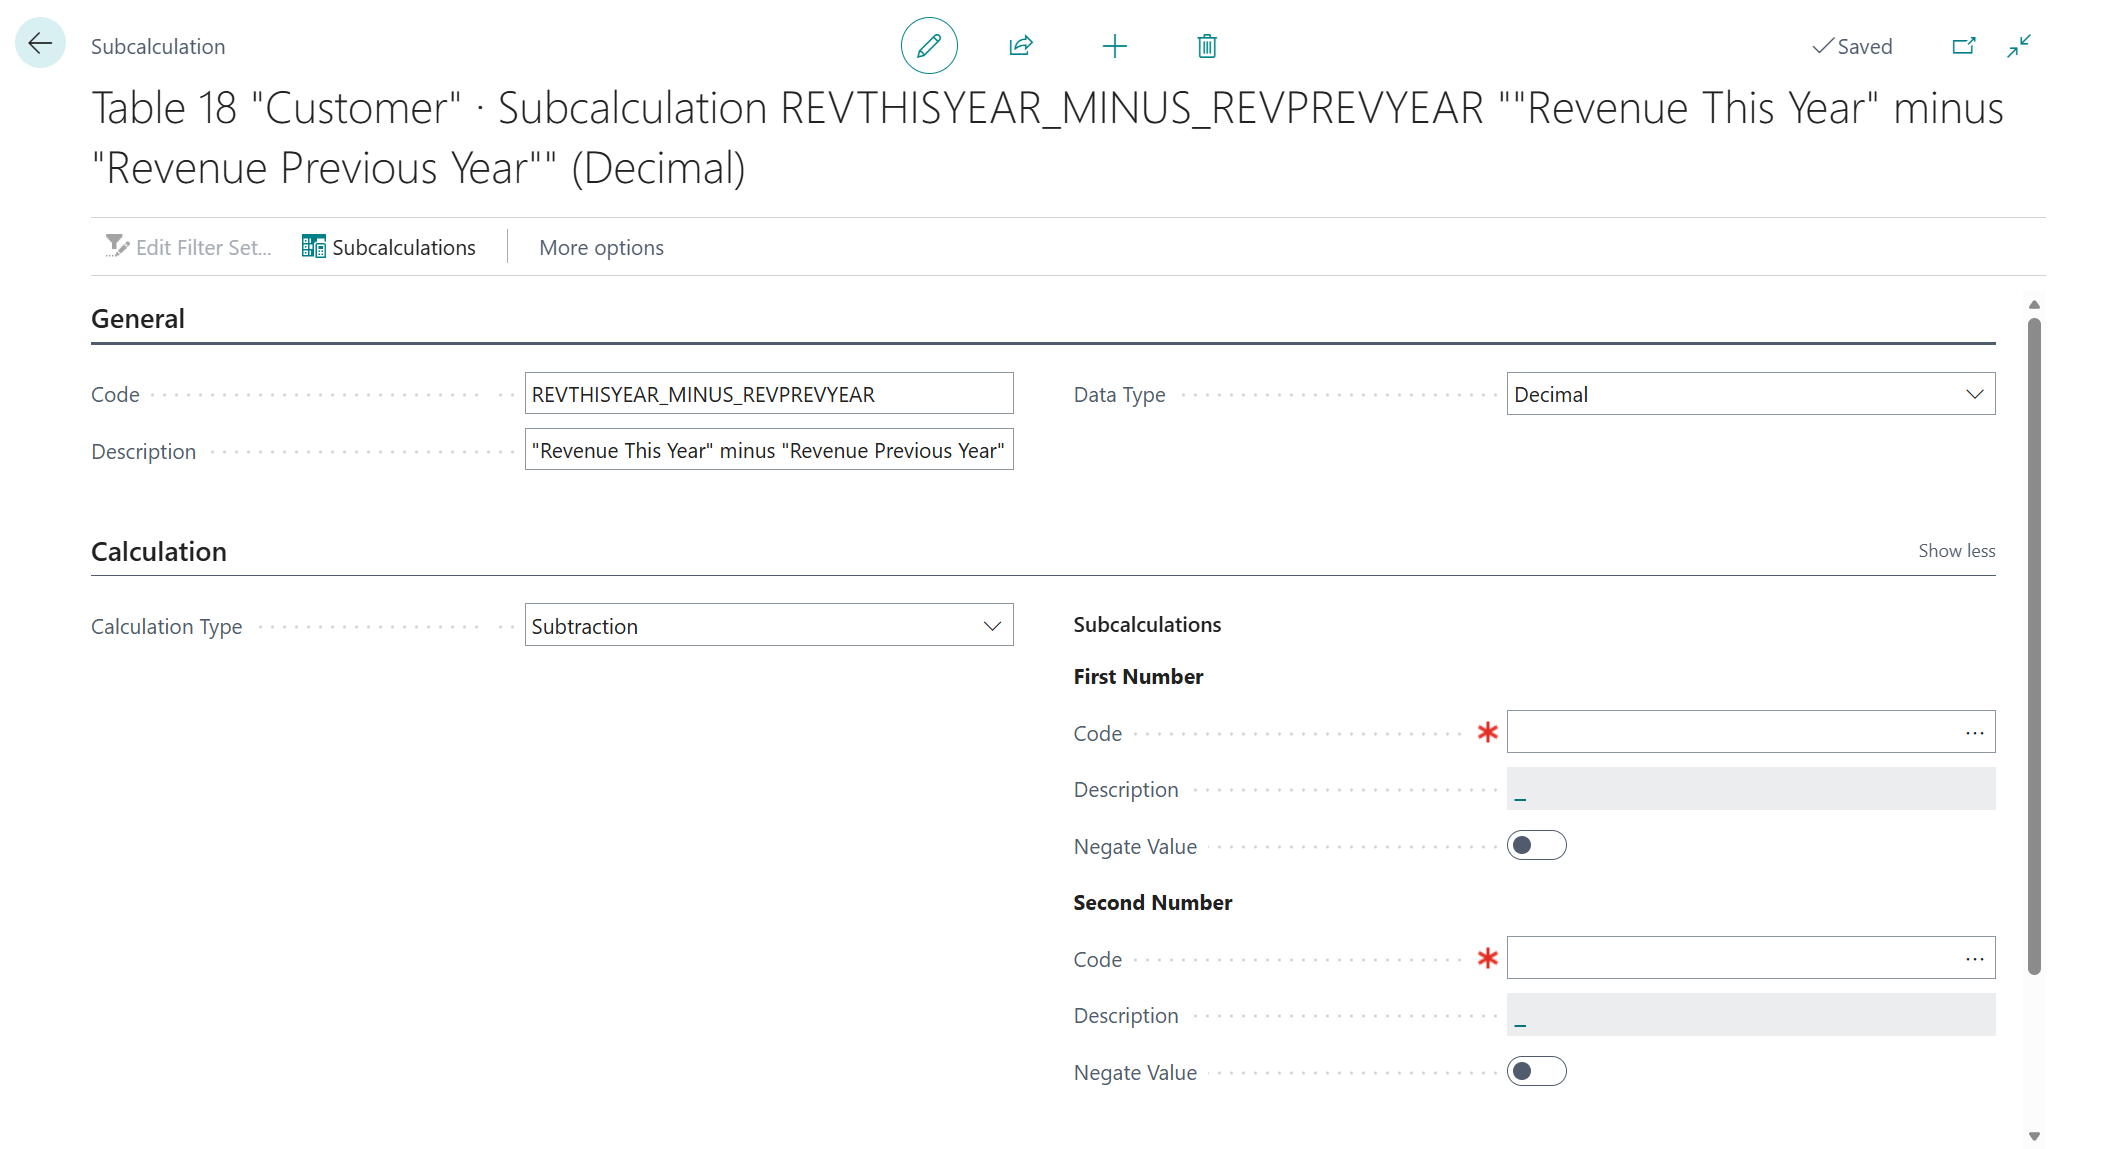
Next, we will need to set up two other subcalculations that will be used for our calculation:
-
5.1.1. Revenue This Year (Sum)
On the First Number - Code page field, click on the Assist-Edit () button to set up the subcalculation to use.
On the page that opens, invoke the New action to create and configure a new subcalculation.
And then, configure the new "Revenue This Year" subcalculation as follows:
- Code =
REVTHISYEAR - Description =
Revenue This Year - Calculation Type = Sum
- Table =
21"Cust. Ledger Entry" - Value Field =
19"Profit (LCY)" -
Filter Set set up as follows:
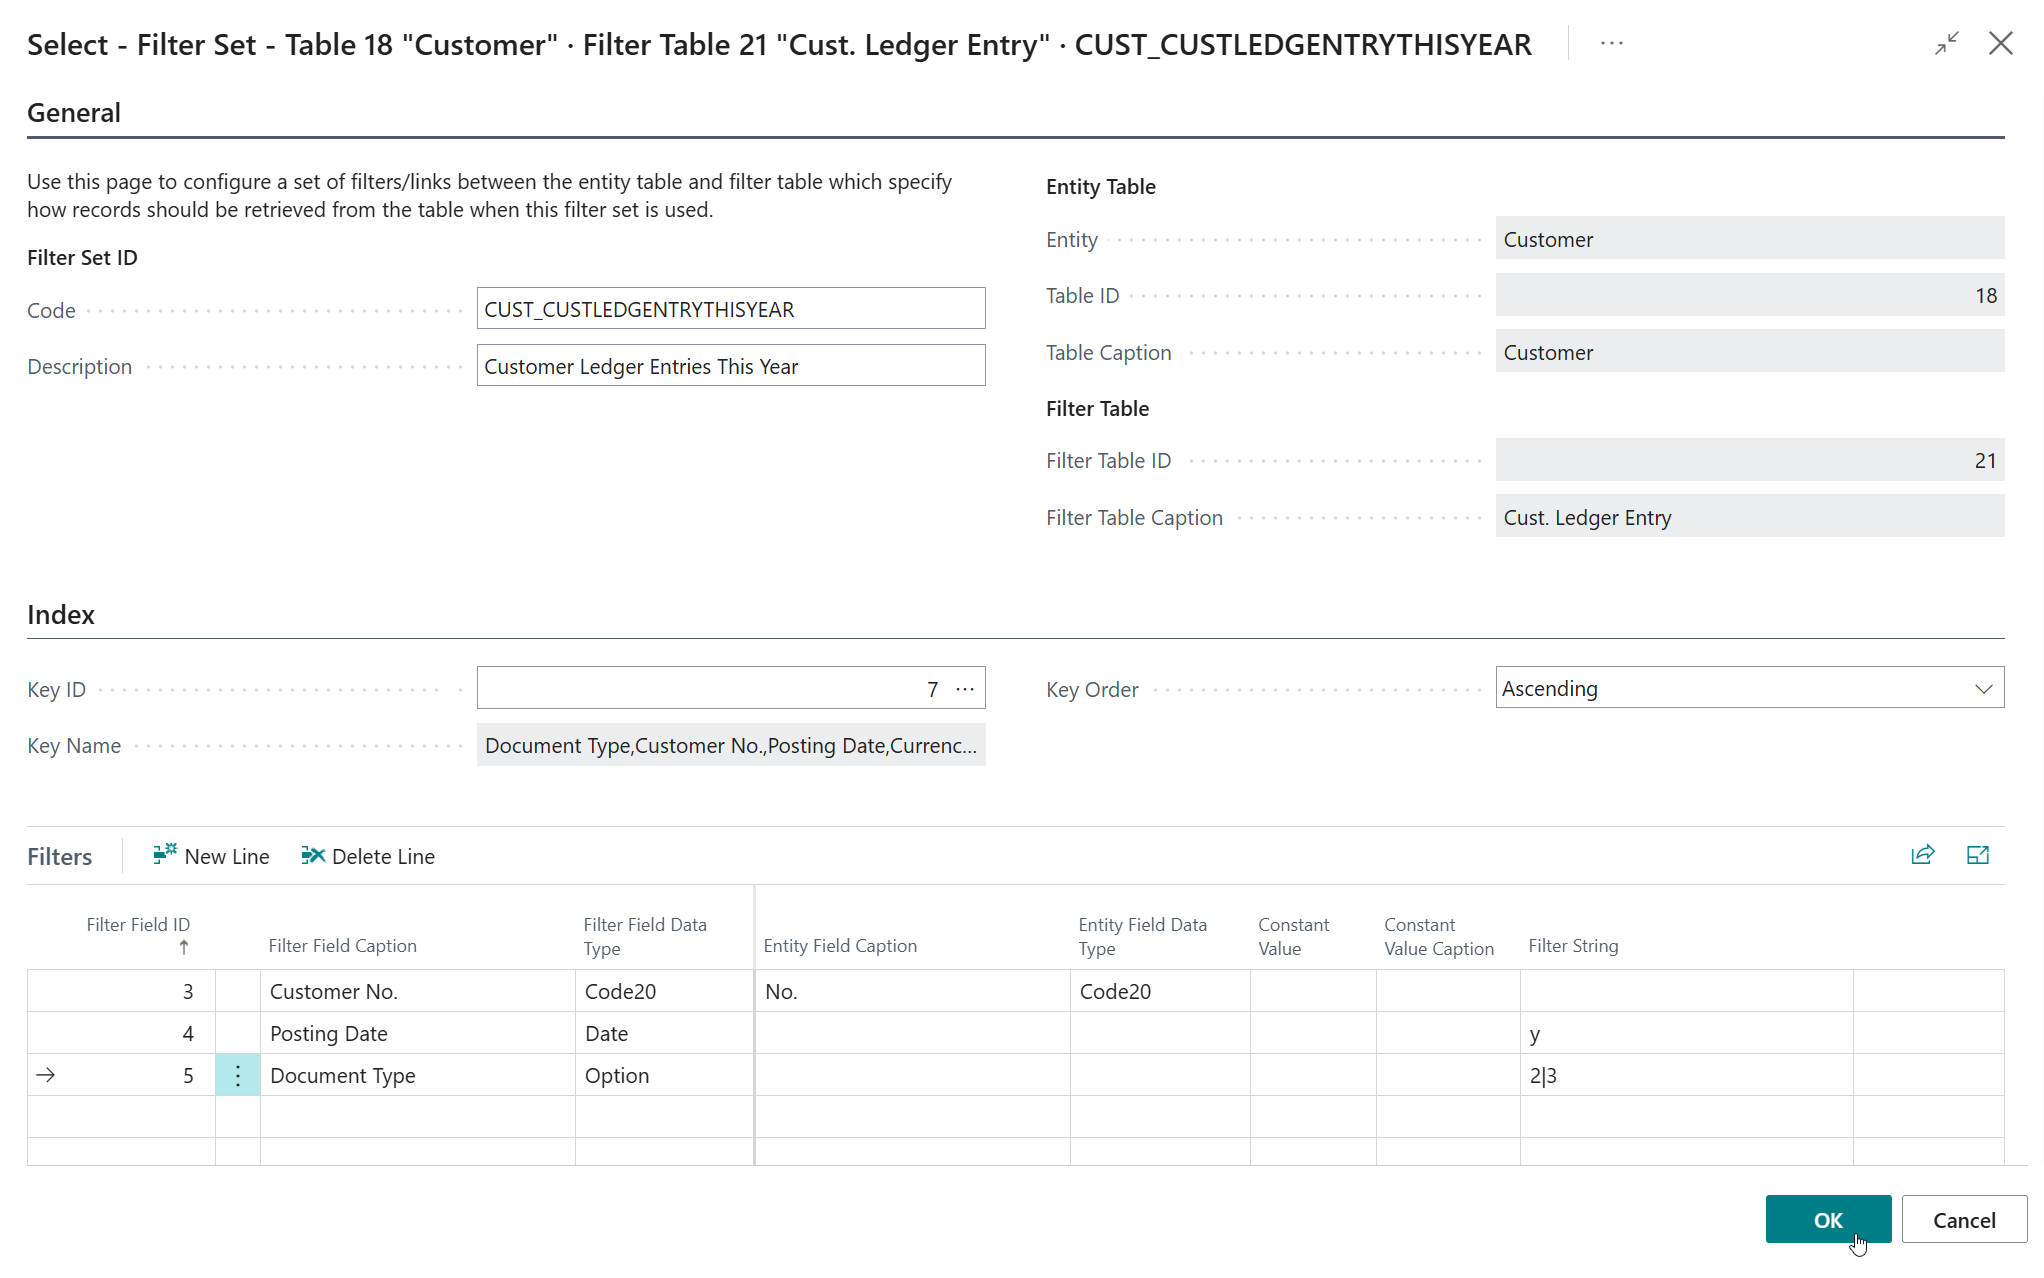
- Code =
CUST_CUSTLEDGENTRYTHISYEAR - Description =
Customer Ledger Entries This Year - Key =
7"Document Type,Customer No.,Posting Date,Currency Code" -
Filters:
- Field ID
3Customer No." must be linked to Entity Field ID =1(No.**) - Field ID
4Posting Date set to filter on Filter String =y('this year') - Field ID
5Document Type set to filter on Filer String =2|3(invoice or credit memo)
Tip
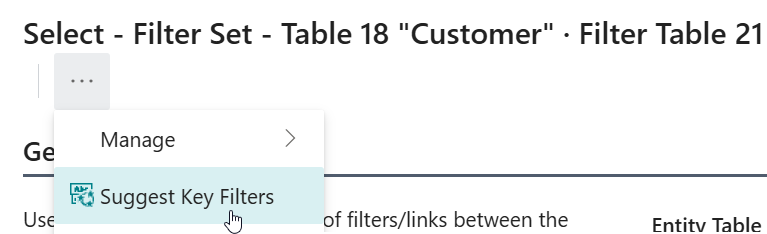
Use the Suggest Key Filters action to quickly set up the filter records.
- Field ID
- Code =
- Code =
-
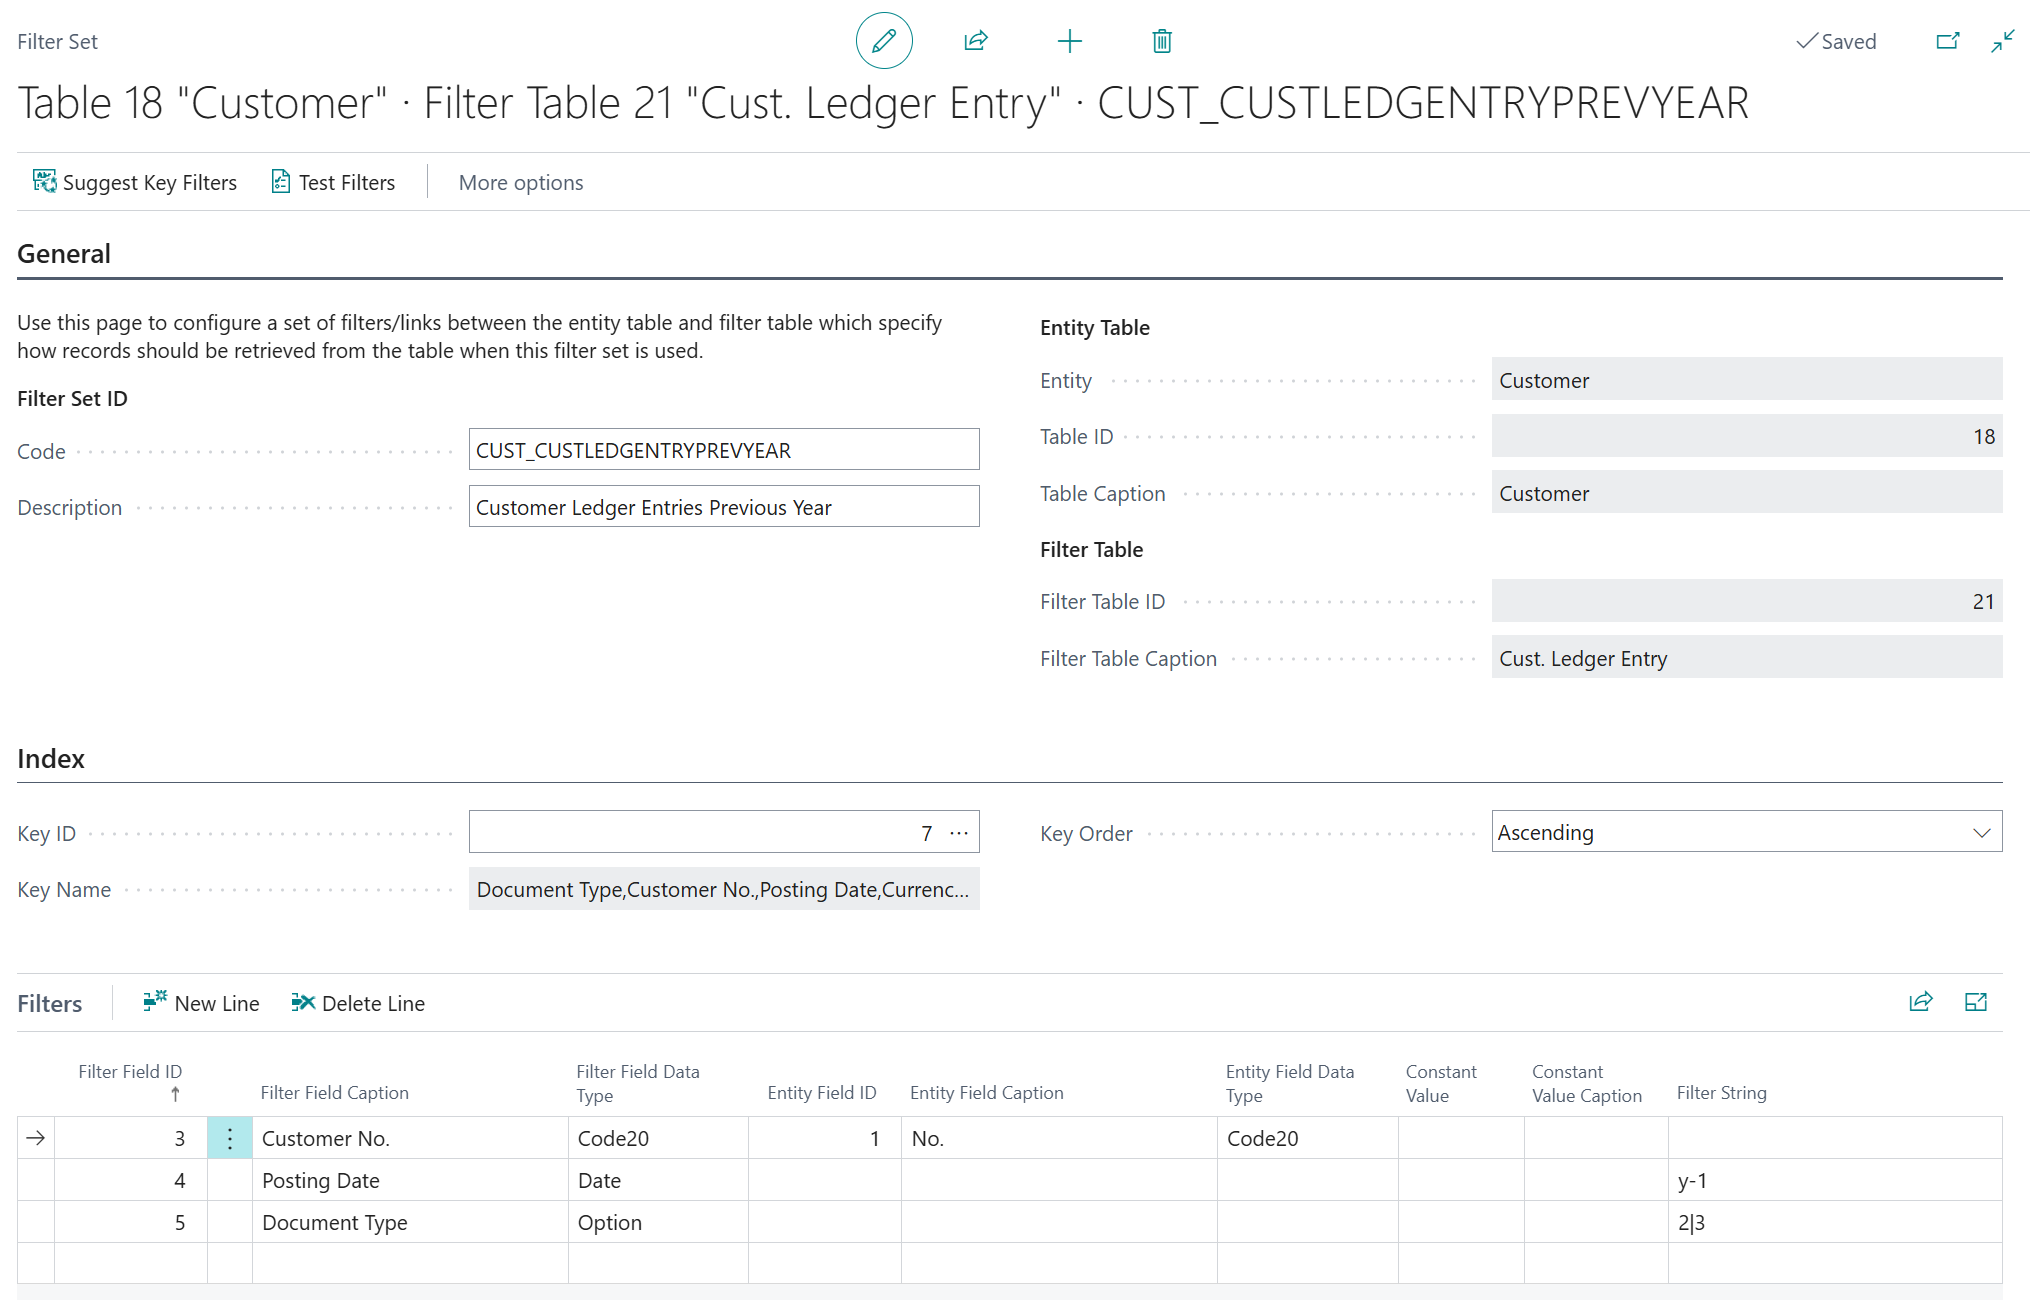
5.1.2. Revenue Previous Year (Sum)
On the Second Number - Code page field, click on the Assist-Edit () button to set up the subcalculation to use.

On the page that opens, invoke the New action to create and configure a new subcalculation.
And then, configure the new "Revenue Previous Year" subcalculation as follows:
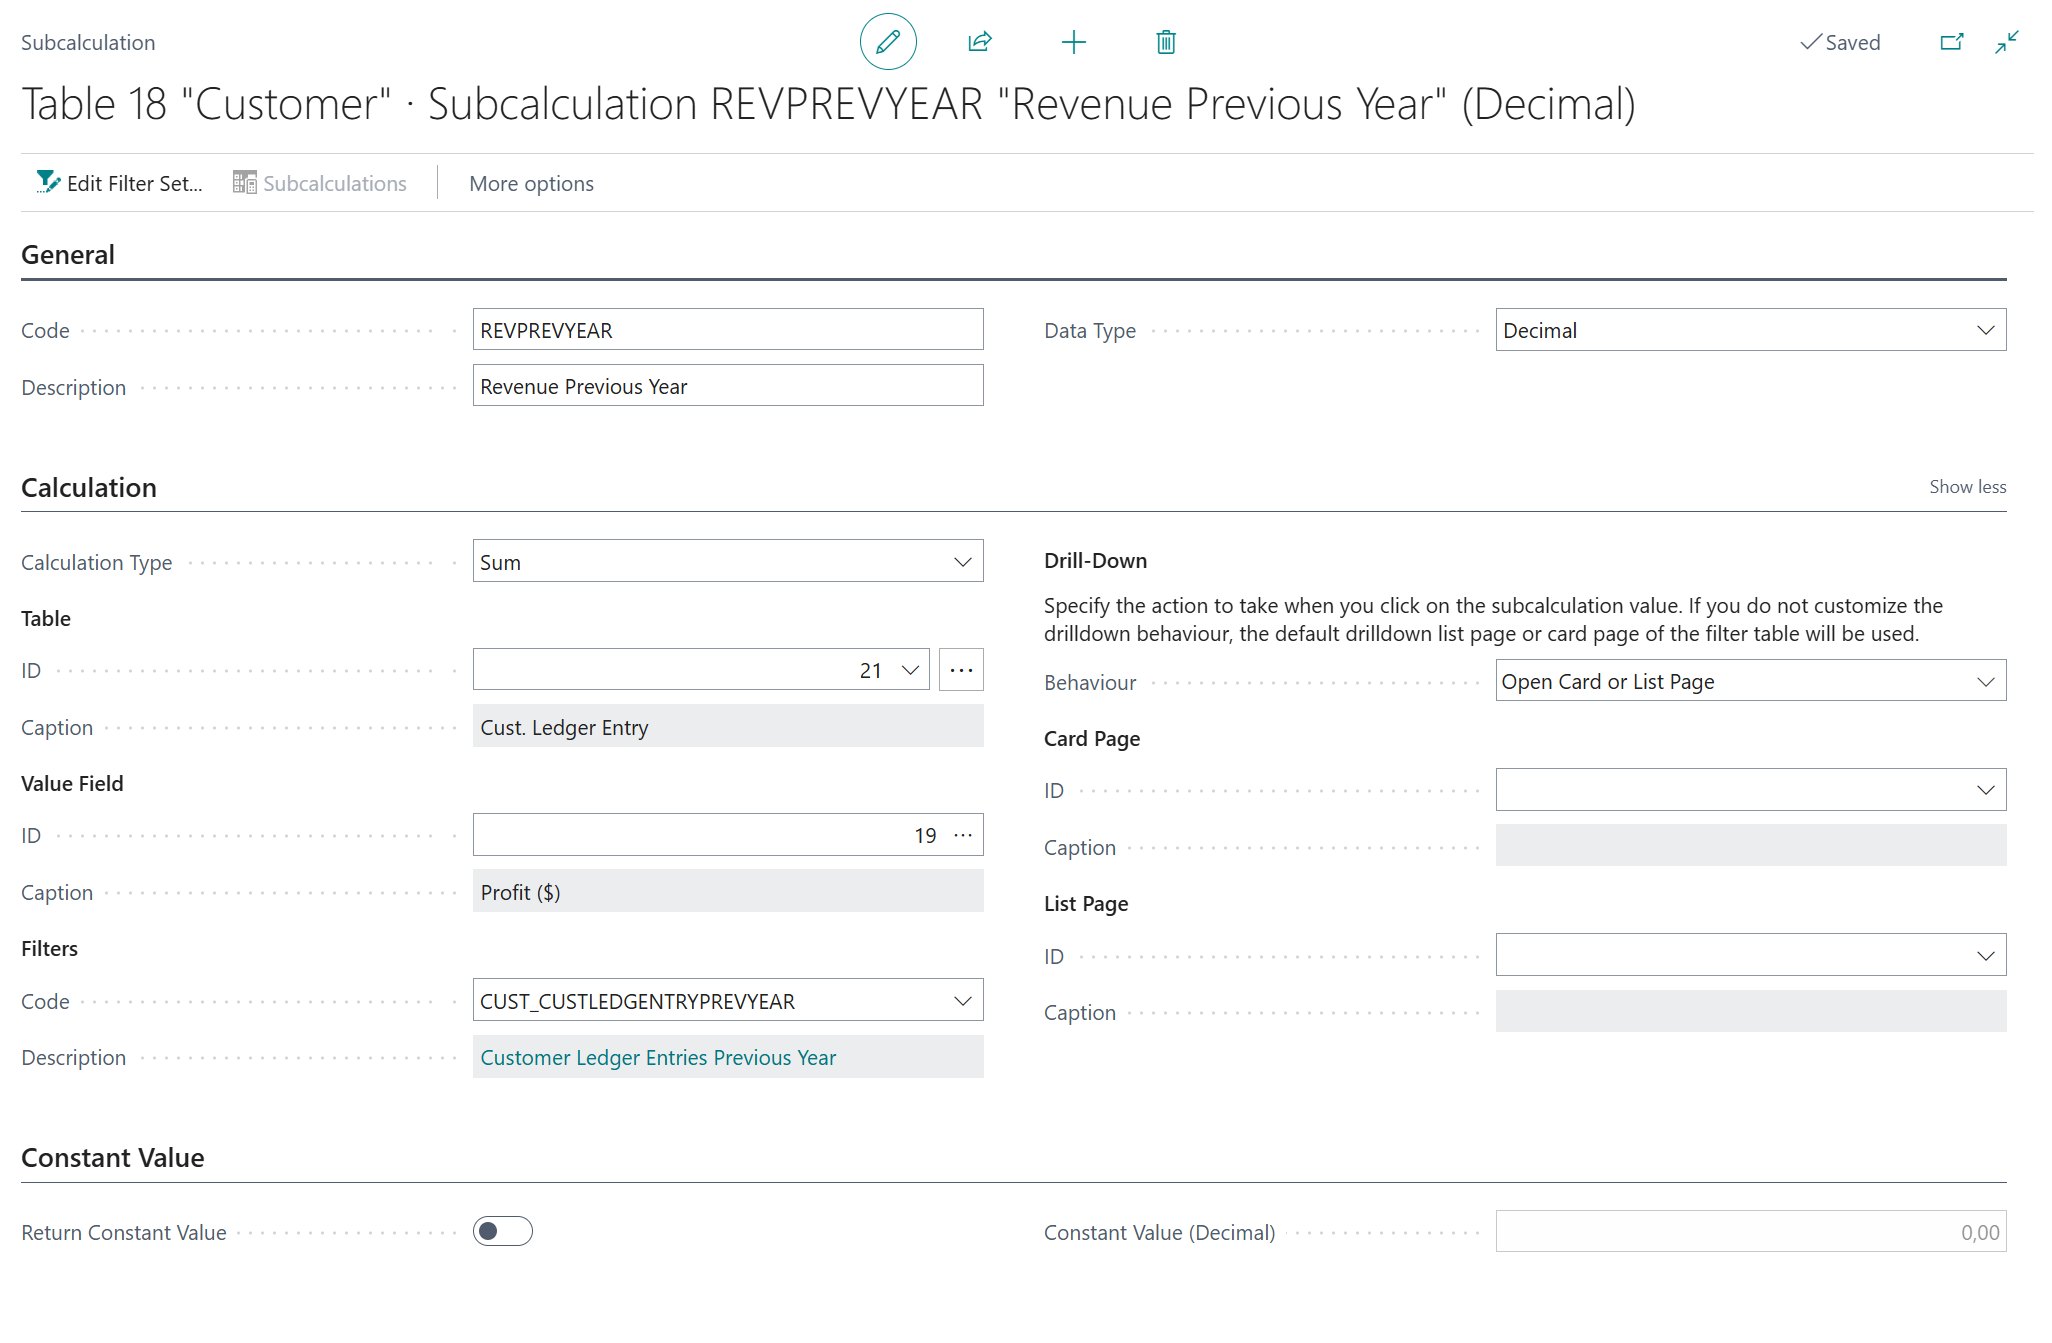
- Code =
REVPREVYEAR - Description =
Revenue Previous Year - Calculation Type = Sum
- Table =
21"Cust. Ledger Entry" - Value Field =
19"Profit (LCY)" -
Filter Set set up as follows:
- Code =
CUST_CUSTLEDGENTRYPREVYEAR - Description =
Customer Ledger Entries Previous Year - Key =
7"Document Type,Customer No.,Posting Date,Currency Code" -
Filters:
- Field ID
3Customer No." must be linked to Entity Field ID =1(No.**) - Field ID
4Posting Date set to filter on Filter String =y-1('previous year') - Field ID
5Document Type set to filter on Filer String =2|3(invoice or credit memo)
- Field ID
- Code =
- Code =
The end-result of the
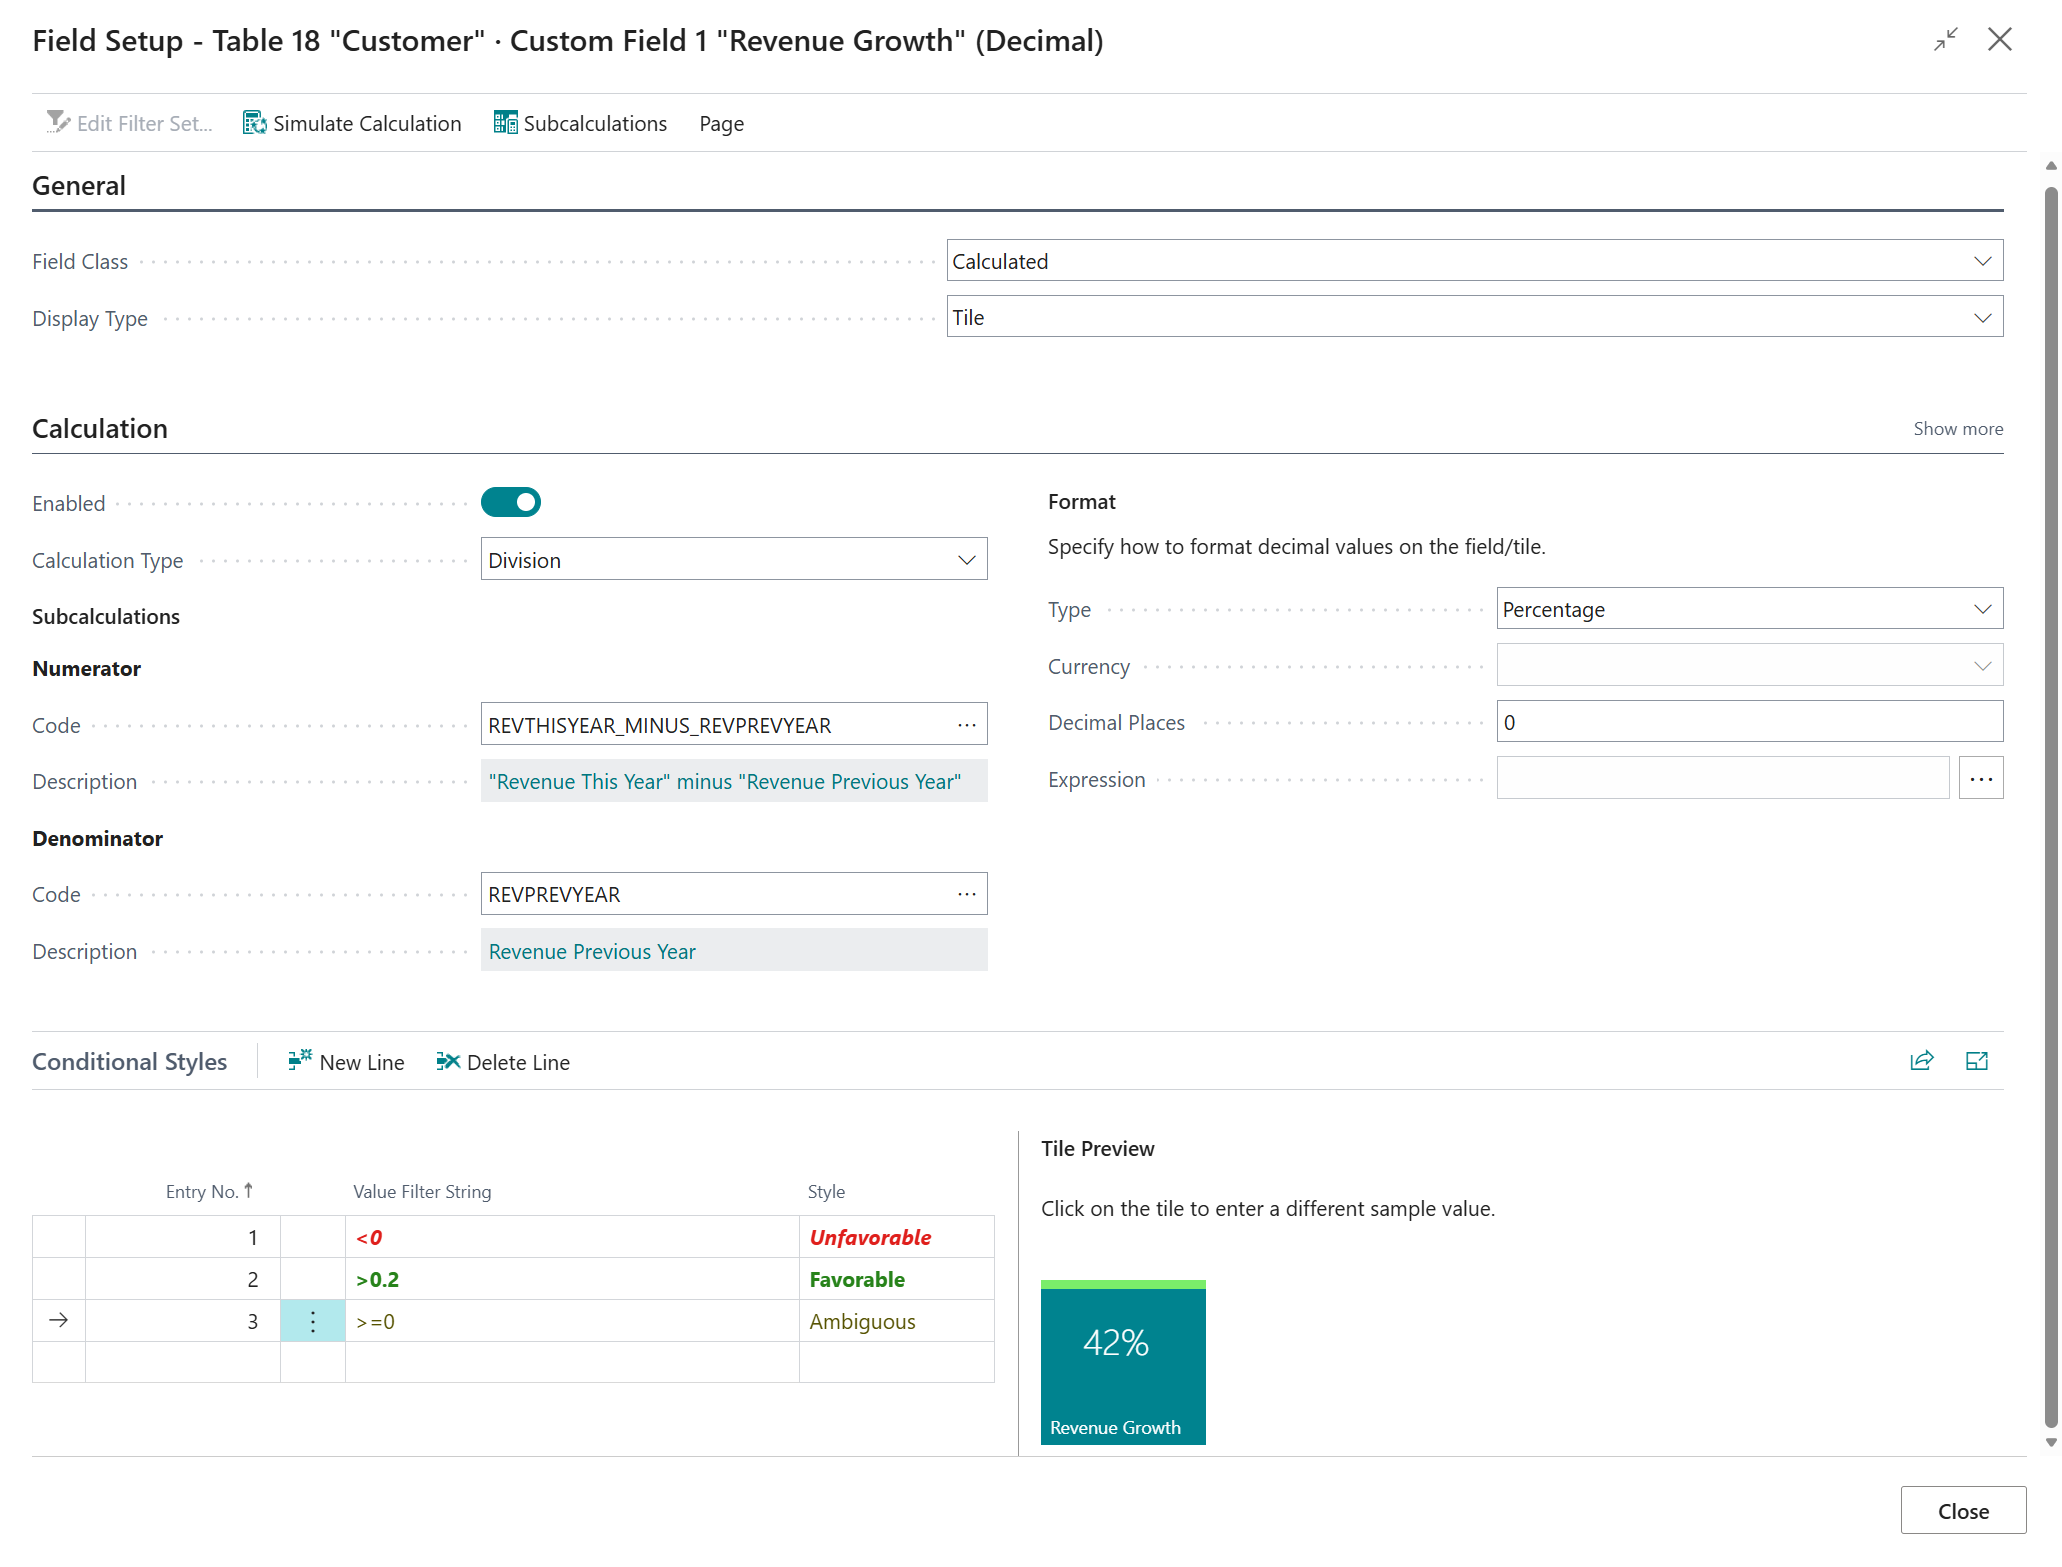
REVTHISYEAR_MINUS_REVPREVYEAR("Revenue This Year" minus "Revenue Previous Year") calculation configuration should then look like this: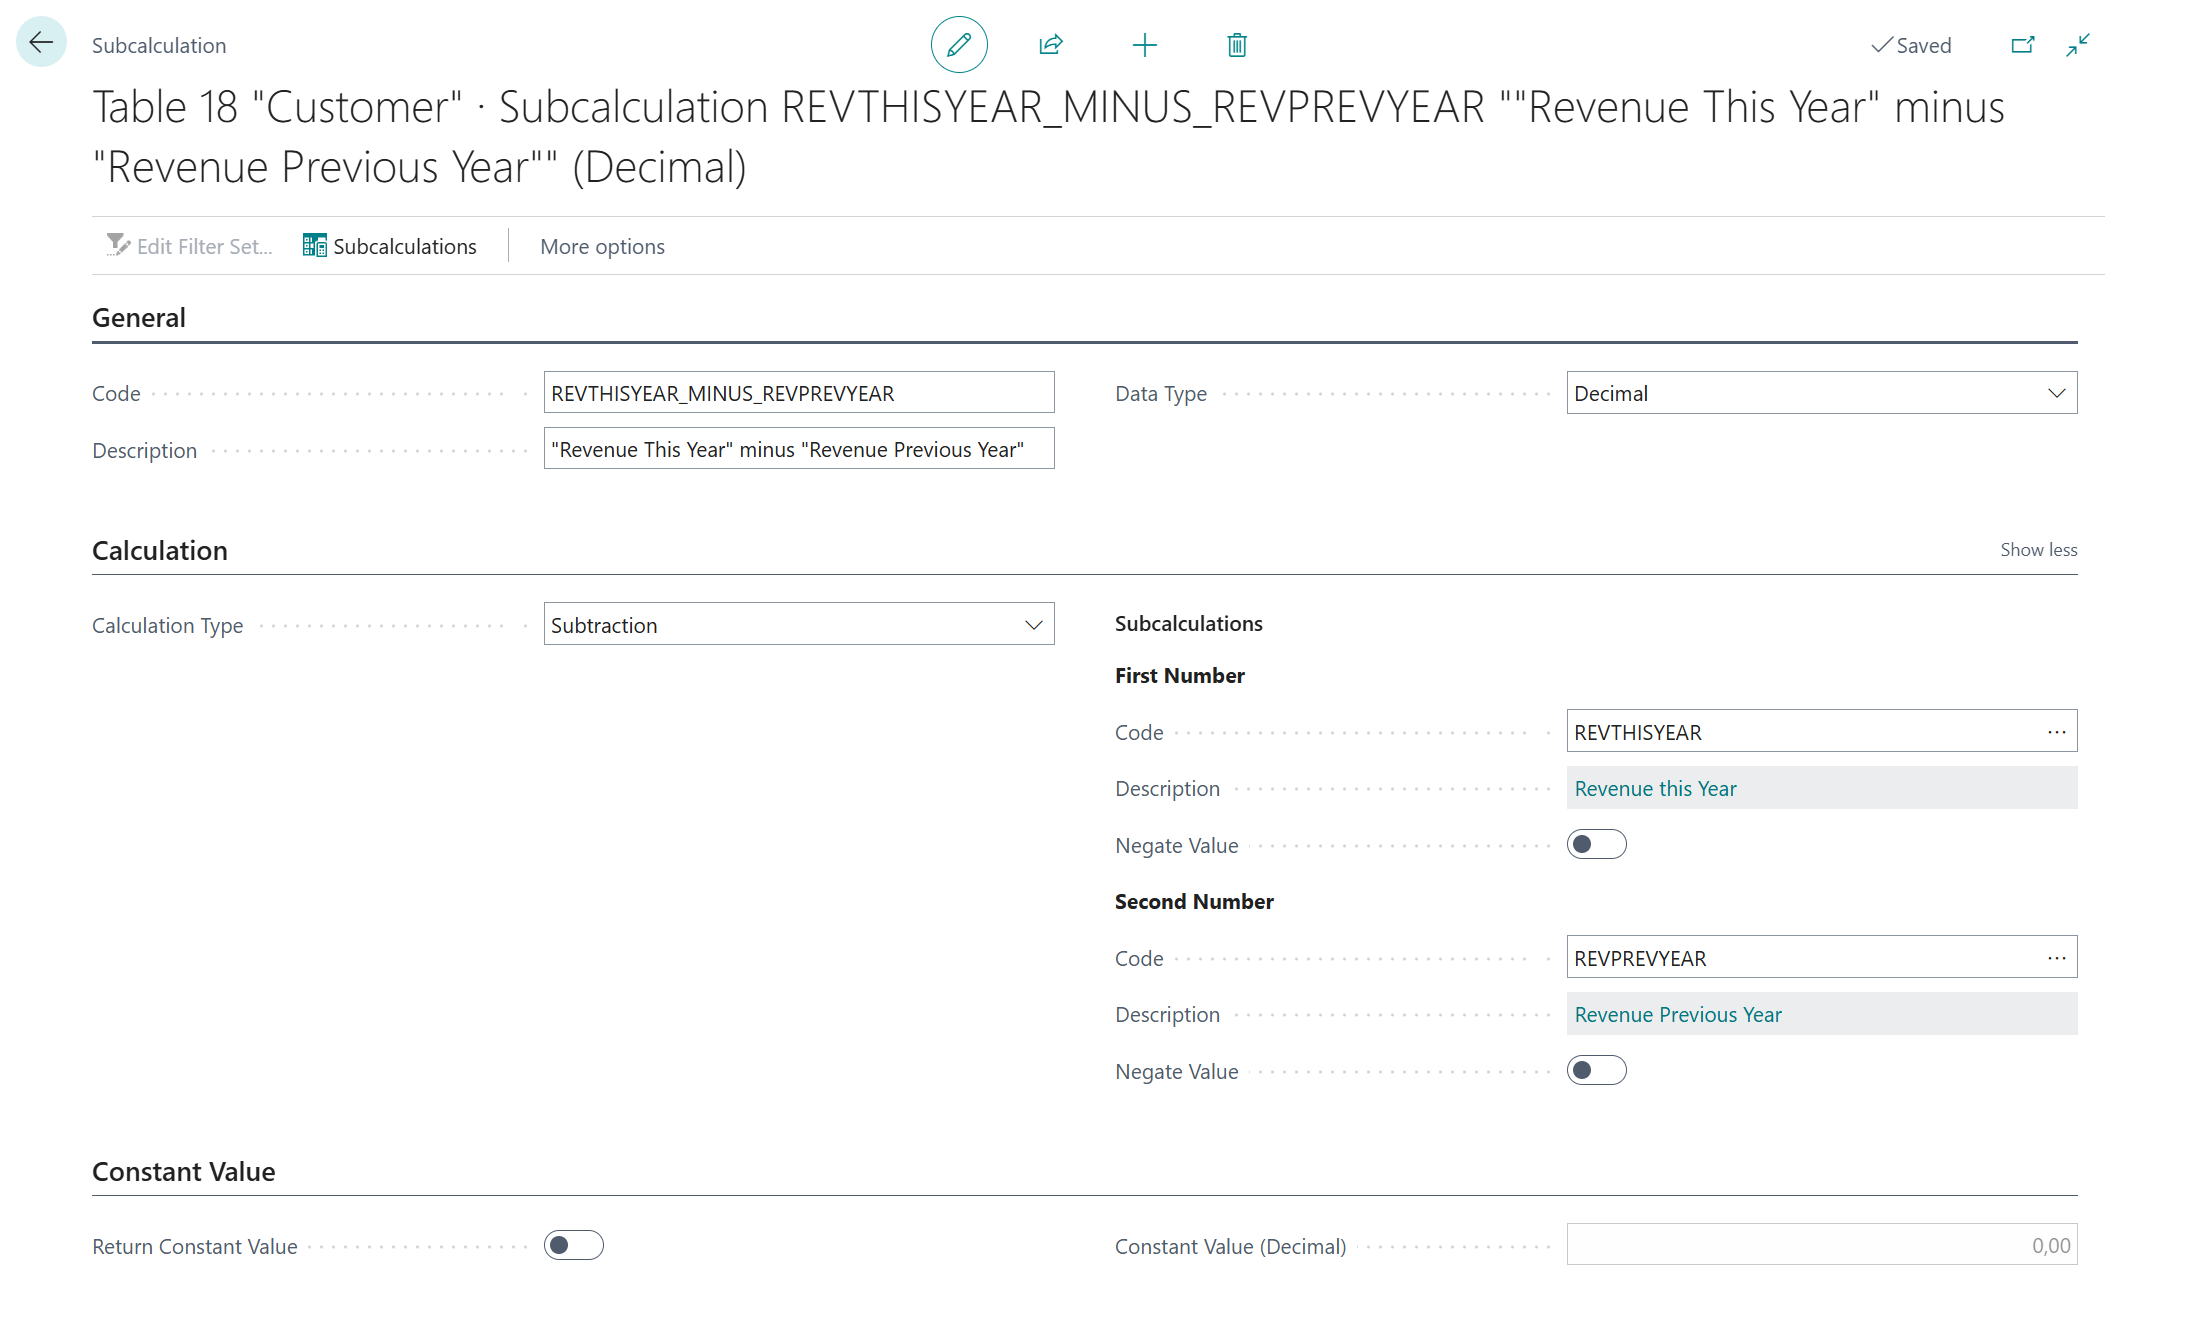
- Code =
-
5.2. Denominator ("Revenue Previous Year")
Secondly, we are going to configure the denominator calculation, which will calculate the following mathematical expression:
\[ \text{“Revenue Previous Year”} \]On the Denominator - Code page field, click on the Assist-Edit () button to set up the subcalculation to use.
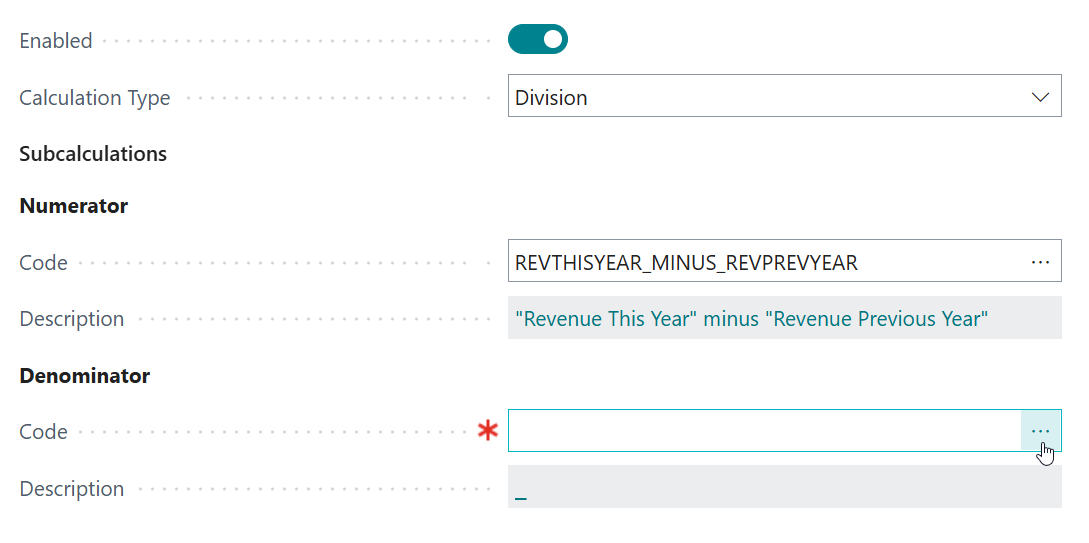
On the page that opens, select the earlier configured
REVPREVYEAR(Revenue Previous Year) subcalculation, and then click on OK.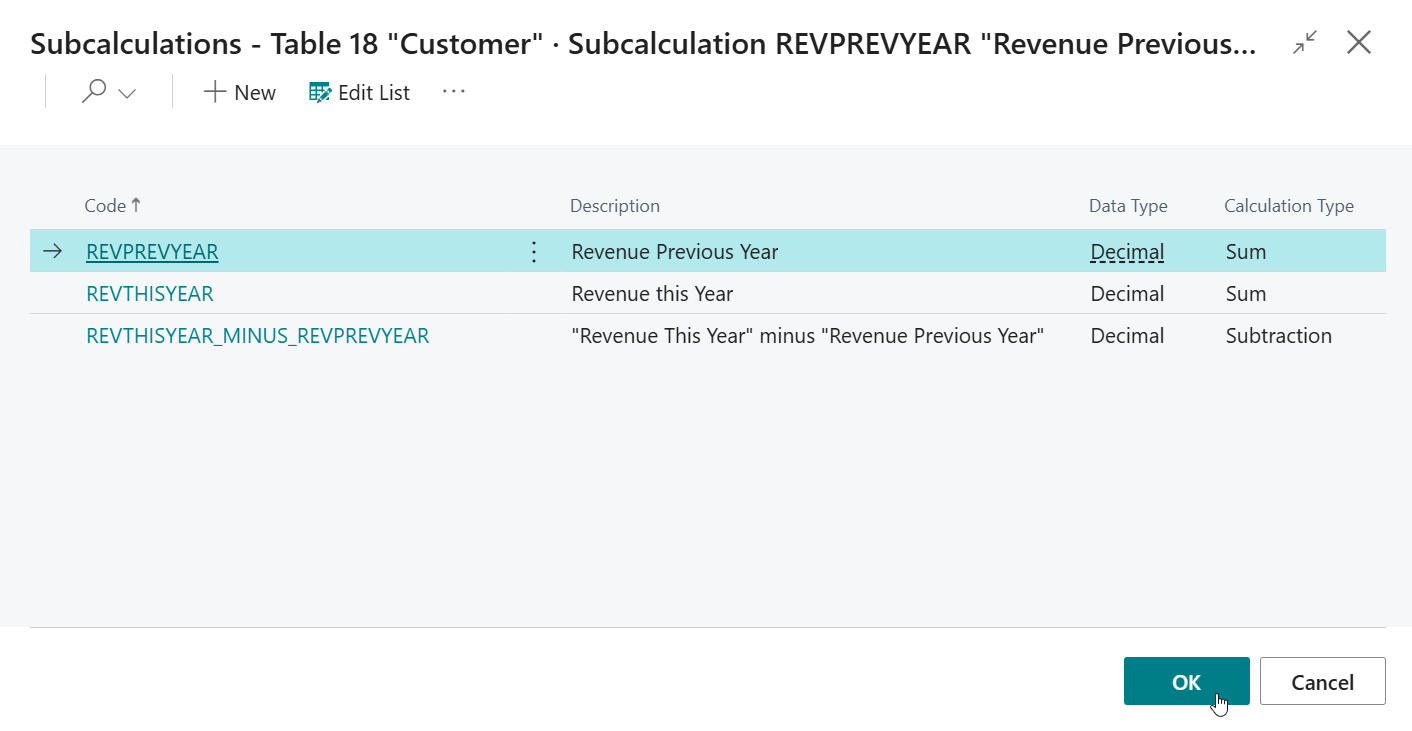
In the end, the Numerator and Denominator subcalculations should be configured as follows:
-
-
Next, change the Format settings so that Type = Percentage is used.
If you don't want any decimal places to be shown, then set Decimal Places =
0, so that only whole numbers will be displayed.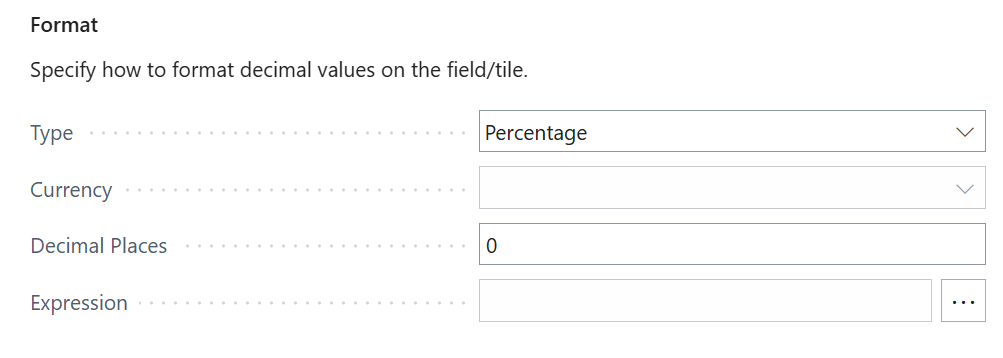
-
If you want to, you can also Configure Conditional Styles, e.g., when the Revenue Growth is smaller than
0, then a red color should be used, and when it is larger than0.2a green color should be used.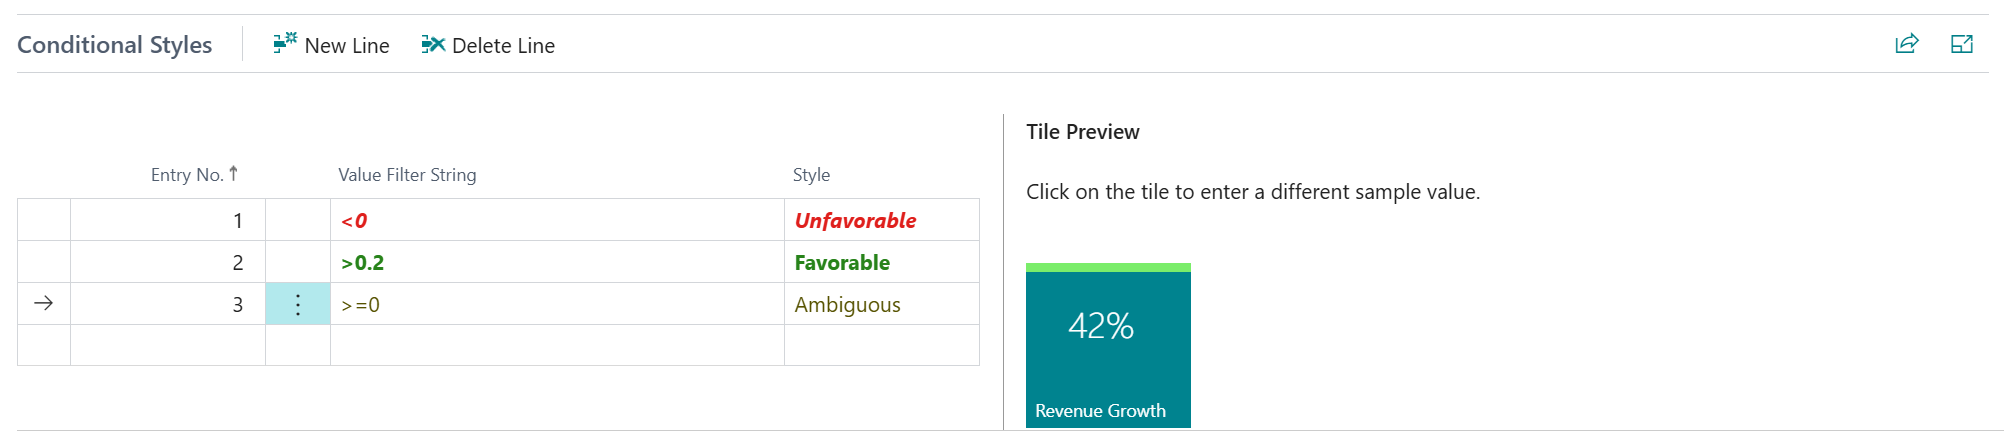
-
The final configuration of the Revenue Growth field calculation will look like the following:
-
Let's open the Customer List page and have a look at the result:
Note
To have custom fields and tiles visible on the Customer List page, you should first enable field visibility on the Custom Field Visibility page.
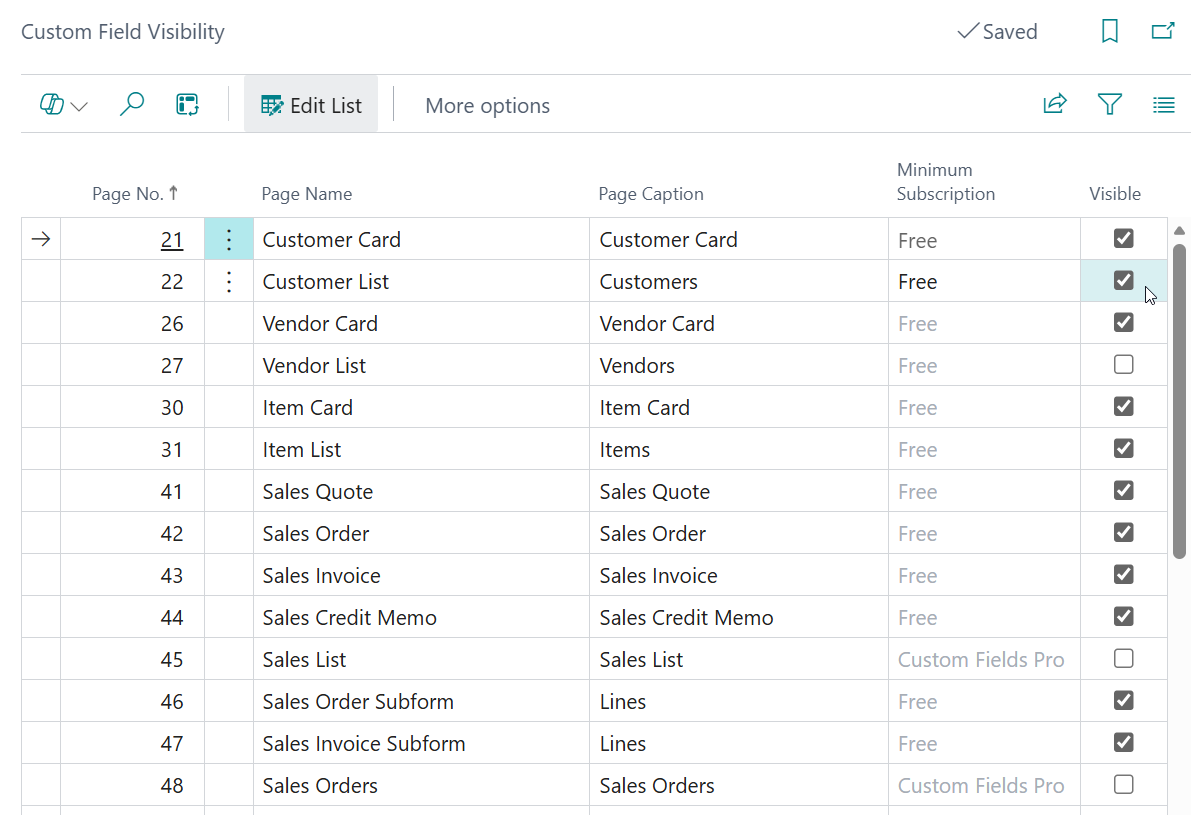
By default, custom fields and tiles are not visibile on the Customers list page, so if you want them visible you should adjust this configuration.
-
Note that you can also drill down on the composite calculation by clicking on the tile. A dialog page opens where you can the subcalculation result values used by the composite calculation.